
目錄表
Slackware的安裝
Slackware的安裝程式和其他大多數Linux發行版比起來是比較簡單的,很容易讓人聯想到安裝BSD作業系統。如果你熟悉BSD作業系統,你應該有賓至如歸的感覺。如果你從來沒有安裝Slackware或使用文字模式的安裝程式,你可能會感到有點不知所措在。不要驚慌!安裝很容易,一旦你了解它,它適用於幾乎任何x86平台上。
最後版本的 Slackware 是發行於DVD或CD,但Slackware可以有其他的安裝方式。在這本書中我們只專注於最常用的方法 - 從DVD啟動。如果您沒有CD或DVD,您可以從您熟悉的Slackware的伺服器去查看在“USB和PXE安裝目錄”下的README文件。此目錄包含必要的文件和指示,告訴你如何從USB姆指碟或支持PXE的網路卡載入Slackware的安裝程序。該文件是關於這種開機媒體的最好信息來源。
A HOWTO on setting up a PXE boot server right off a Slackware installation medium (DVD or USB Stick) is available in this separate article: Out of the box Slackware PXE Server
啟動安裝程式
啟動安裝程式是最簡單的程序,只要把安裝光碟放進你的光碟機中,然後重新啟動你的電腦。你可能需要進入你電腦的 BIOS 改變開機順序讓光碟機的開機順序在硬碟之前。有些電腦允許你在開機時按特殊鍵去改變開機順序。由於每一台電腦上是不同的,我們無法提供關於如何做到這一點的說明,但幾乎所有的機器上要改變開機順序都很簡單。
在你由CD用開機後,螢幕上會顯示一個畫面允許您輸入任何特殊的內核參數。這主要是讓你使用安裝程序作為一種救援磁盤來使用。有些系統在啟動時可能需要特殊的內核參數,但這種狀況非常罕見。大多數用戶可以按 enter 鍵即可讓內核啟動。
Welcome to Slackware version 13.37 (Linux kernel 2.6.37.6)!

If you need to pass extra parameters to the kernel, enter them at the prompt
below after the name of the kernel to boot (huge.s etc).

In a pinch, you can boot your system from here with a command like:

boot: huge.s root=/dev/sda1 rdinit= ro

In the example above, /dev/sda1 is the / Linux partition.

This prompt is just for entering extra parameters.  If you don't need to enter
any parameters, hit ENTER to boot the default kernel "huge.s" or press [F2]
for a listing of more kernel choices.
您應該會看到大量的文字出現在螢幕上。不要驚慌,這是完全正常的。你看到的文字是由內核在啟動過程中發現您的硬件和準備加載操作系統所顯示出來的。如果你有興趣閱讀這些信息您可以在以後使用“dmesg(1)”命令查看。通常這些訊息在解決硬件問題時是非常重要的。一旦內核完成硬件搜尋,這些消息就會停止,你會得到一個選項去加載非美式鍵盤的支持。
<OPTION TO LOAD SUPPORT FOR NON-US KEYBOARD>

If you are not using a US keyboard, you may need to load a different
keyboard map.  To select a different keyboard map, please enter 1
now.  To continue using the US map, just hit enter.

Enter 1 to select a keyboard map: _
輸入 1 ,然後按 ENTER 會給你一個鍵盤映射的列表。只需選擇與您鍵盤類型相匹配的映射然後繼續。
Welcome to the Slackware Linux installation disk! (version 13.37)

######  IMPORTANT!  READ THE INFORMATION BELOW CAREFULLY.  ######

- You will need one or more partitions of type 'Linux' prepared.  It is also
  recommended that you create a swap partition (type 'Linux swap') prior
  to installation.  For more information, run 'setup' and read the help file.

- If you're having problems that you think might be related to low memory, you
  can try activating a swap partition before you run setup.  After making a
  swap partition (type 82) with cfdisk or fdisk, activate it like this:
    mkswap /dev/<partition> ; swapon /dev/<partition>

- Once you have prepared the disk partitions for Linux, type 'setup' to begin
  the installation process.

- If you do not have a color monitor, type:  TERM=vt100
  before you start 'setup'.

You may now login as 'root'.

slackware login: **root**
不像其它 Linux 發行版本直接載入安裝程式,Slackware的安裝程式載入有限的Linux發行版本到系統的RAM上。這種有限的發行版本可用來手動執行安裝程式,或在緊急情況下可用於修復無法啟動的損壞系統。現在你以root身份登錄(不需要密碼),接下來是設置你的磁碟。在這個時候,你可以設置軟件RAID或LVM,如果你願意甚至是加密的根分割區,但這些話題是這本書的範圍之外。如果你希望設置您的系統擁有這些先進的功能,我鼓勵你去參考在你光碟片上的 README_RAID.TXT,README_LVM.TXT 和 README_CRYPT.TXT 等優秀文件。大多數用戶不會有這樣的需要應該直接進行分割。
分割
Slackware 安裝媒體中附有硬碟分割來分割硬碟。
一般分割硬碟包含了以下步驟:
- 執行所需的工具在要分割的硬碟。
- 查看現在旳分割表中是否有其它已存在的分割區。
- 如果有需要刪除不需要的分割區。
- 建立新的分割區。
- 設定新分割區的類型和大小。
- 繼續建主其它所需的分割區。
- 改變分割區的類型 (Swap, Linux, Solaris, etc)。
- 設定所需分割區為可開機。
- 寫入分割表。
fdisk
依造下是步驟使用 fdisk 去分割一個硬碟. 這裏只是一個例子,你可依個人需求建立分割區大小, :
建一個新分割區給 swap 使用:
root~# fdisk <path to drive> | (for example /dev/sda) <Return>
Command (m for help): p <Return>
  Disk /dev/sda: 64 heads, 63 sectors621 cylinders
Units = cylinders of 4032 * 512 bytes
Command (m for help): n <Return>
Command action
   e   extended
   p   primary partition (1-4)
p <Return>

Partition number (1-4): 1 <Return>
First cylinder (1-621, default 1): 1 <Return>
Using default value 1
Last cylinder or +size or +sizeM or +sizeK (1-621, default 621): 100 <Return>
現在改變這分割區的類型為 swap:
Command (m for help): t <Return>
Partition number (1-4): 1 <Return>
Hex code (type L to list codes): 82 <Return>
Changed system type of partition 1 to 82 (Linux swap)
接下來建立主要分割區而且需要可開機:
Command (m for help): n <Return>
Command action
   e   extended
   p   primary partition (1-4)
p <Return>
Partition number (1-4): 2 <Return>
First cylinder (101-621, default 101): <Return>
Using default value 101
Last cylinder or +size or +sizeM or +sizeK (101-621, default 621): <Return> | (the remainder of the disk will be used)
使這個新分割區可開機:
Command (m for help): a <Return>
Partition number (1-4): 2 <Return>
再按 p <Return> 去查看新的分割表:
Disk /dev/hdb: 64 heads, 63 sectors, 621 cylinders
Units = cylinders of 4032 * 512 bytes

   Device Boot    Start       End    Blocks   Id  System
/dev/hdb1            1        100    203797+  82  Linux swap
/dev/hdb2   *        101      621    1048107  83  Linux
最後我們使用 w <Return> 將分割表寫入。
這是一個非常簡單的分割表, 一般 fdisk 支援建立混和邏輯和實際的分割區。
cfdisk
cfdisk 除了具有 fdisk 所有功能外還會用一個簡單的使用者介面將現在的分割表顯示出來。使用者可以由使用箭頭或跳格鍵去選擇在螢幕底部的選單項來達成 fdisk 的同樣的功能:
                                cfdisk 2.12r

                            Disk Drive: /dev/sda
                      Size: 5108373319 bytes, 5.1 GB
            Heads: 64   Sectors per Track: 63   Cylinders: 621

  Name        Flags      Part Type  FS Type          [Label]        Size (MB)

  sda1                    Primary   Linux swap                       822.61
  *sda2       Boot        Primary   Linux                           4285.76


  *[Bootable]* [ Delete ]  [  Help  ]  [Maximize]  [ Print  ]
   [  Quit  ]  [  Type  ]  [ Units  ]  [ Write  ]

               *Toggle bootable flag of the current partition*
安裝程式
幫助
如果以前從未安裝過 Slackware,你可以從 Help 選單是讀到非常基本的 Slackware 安裝程式概念。 大部份在這裡的信息是通過安裝程序相當直觀的導航,即使你從未使用過 curses 基礎的程式,你可能會發現這很有用。
Keymap
Before we go any further, Slackware gives you the opportunity to select a different mapping for your keyboard. If you're using a standard US keyboard you can safely skip this step, but if you're using an international keyboard you will want to select the correct mapping now. This ensures that the keys you press on your keyboard will do exactly what you expect them to do.
Addswap
If you created a swap partition, this step will allow you to enable it before running any memory-intensive activities like installing packages. swap space is essentially virtual memory. It's a hard drive partition (or a file, though Slackware's installer does not support swap files) where regions of active system memory get copied when your computer is out of useable RAM. This lets the computer “swap” programs in and out of active RAM, allowing you to use more memory than your computer actually has. This step will also add your swap partition to /etc/fstab so it will be available to your OS.

Target
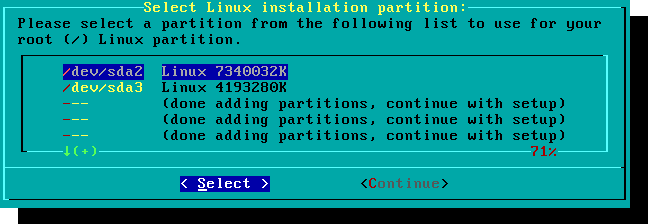
Our next step is selecting our root partition and any other partitions we'd like Slackware to utilize. You'll be given a choice of filesystems to use and whether or not to format the partition. If you're installing to a new partition you must format it. If you have a partition with data on it you'd like to save, don't. For example, many users have a seperate /home partition used for user data and elect not to format it on install. This lets them install newer versions of Slackware without having to backup and restore this data.
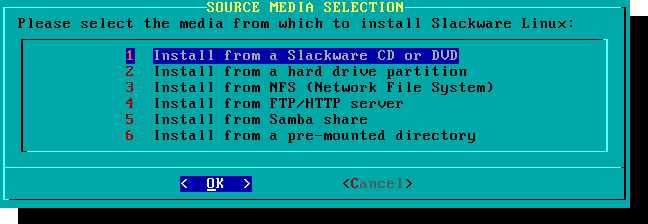
Source
Here you'll tell the installer where to find the Slackware packages. The most common method is to use the Slackware install DVD or CDs, but there are various other options are available. If you have your packages installed to a partition that you setup in the previous step, you can install from that partition or a pre-mounted directory. (You may need to mount that partition with mount(8) first. See chapter 11 for more details.) Additionally, Slackware offers a variety of networked options such as NFS shares, FTP, HTTP, and Samba. If you select a network installation, Slackware will prompt you for TCP/IP information first. We're only going to discuss installation from the DVD, but other methods are similar and straightforward.
Select
One unique feature of Slackware is its manner of dividing packages into disksets. At the beginning of time, network access to FTP servers was available only through incredibly slow 300 baud modems, so Slackware was split into disk sets that would fit onto floppy disks so users could download and install only those packages they were interested in. Today that practice continues and the installer allows you to chose which sets to install. This allows you to easily skip packages you may not want, such as X and KDE on headless servers or Emacs on everything. Please note that the “A” series is always required.

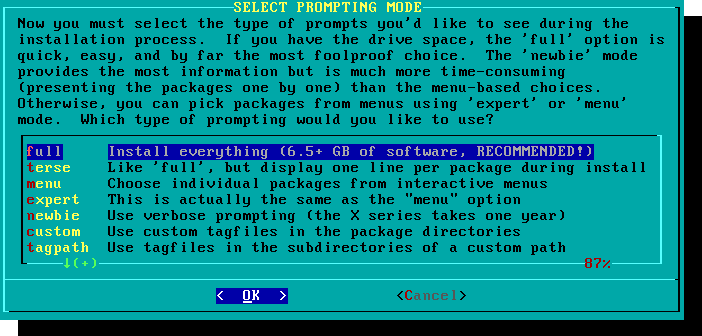
Install
Finally we get to the meat of the installer. At this stage, Slackware will ask you what method to use to choose packages. If this is your first time installing Slackware, the “full” method is highly recommended. Even if this isn't your first time, you'll probably want to use it anyway.
The “menu” and “expert” options allow you to choose individual packages to install and are of use to skilled users familiar with the OS. These methods allow such users to quickly prune packages from the installer to build a very minimal system. If you don't know what you're doing (sometimes even if you do) you're likely to leave out crucial pieces of software and end up with a broken system.
The “newbie” method can be very helpful to a new user, but takes a very long time to install. This method will install all the required packages, then prompt you individually for every other package. The big advantage here is that is pauses and gives you a brief overview of the package contents. For a new user, this introduction into what is included with Slackware can be informative. For most other users it is a long and tedious process.
The “custom” and “tagpath” options should only be used by people with the greatest skill and expertise with Slackware. These methods allow the user to install packages from custom tagfiles. Tagfiles are only rarely used. We won't discuss them in this book.
Configure
Once all the packages are installed you're nearly finished. At this stage, Slackware will prompt you with a variety of configuration tasks for your new operating system. Many of these are optional, but most users will need to set something up here. Depending on the packages you've installed, you may be offered different configuration options than the ones shown here, but we've included all the really important ones.
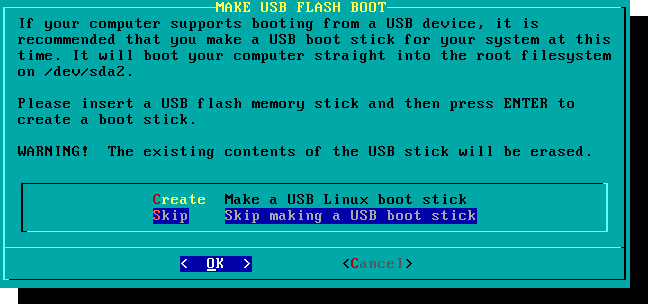
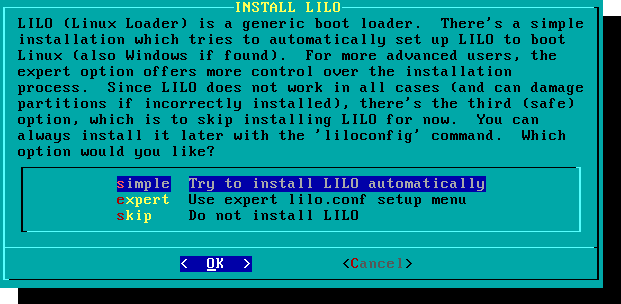
The first thing you'll likely be prompted to do is setup a boot disk. In the past this was typically a 1.44MB floppy disk, but today's Linux kernel is far too larger to fit on a single floppy, so Slackware offers to create a bootable USB flash memory stick. Of course, your computer must support booting from USB in order to use a USB boot stick (most modern computers do). If you do not intend to use LILO or another traditional boot loader, you should consider making a USB boot stick. Please note that doing so will erase the contents of whatever memory stick you're using, so be careful.
Nearly everyone will need to setup the LInux LOader, LILO. LILO is in charge of booting the Linux kernel and connecting to an initrd or the root filesystem. Without it (or some other boot loader), your new Slackware operating system will not boot. Slackware offers a few options here. The “simple” method attempts to automatically configure LILO for your computer, and works well with very simple systems. If Slackware is the only operating system on your computer, it should configure and install LILO for you without any hassle. If you don't trust the simpler method to work, or if you want to take an in-depth look at how to configure LILO, the “expert” method is really not all that complicated. This method will take you through each step and offer to setup dual-boot for Windows and other Linux operating systems. It also allows you to append kernel command parameters (most users will not need to specify any though).
LILO is a very important part of your Slackware system, so an entire section of the next chapter is devoted to it. If you're having difficulty configuring LILO at this stage, you may want to skip ahead and read Chapter 3 first, then return here.
This simple step allows you to configure and activate a console mouse for use outside of the graphical desktops. By activating a console mouse, you'll be able to easily copy and paste from within the Slackware terminal. Most users will need to choose one of the first three options, but many are offered, and yes those ancient two-button serial mice do work.
The next stage in configuring your install is the network configuration. If you don't wish to configure your network at this stage, you may decline, but otherwise you'll be prompted to provide a hostname for your computer. Do not enter a domain name, only the hostname.
The following screen will prompt you for a domainname, such as example.org. The combination of the hostname and the domainname can be used to navigate between computers in your network if you use an internal DNS service or maintain your /etc/hosts file.
You have three options when setting your IP address; you may assign it a static IP, or you may use DHCP, or you may configure a loopback connection. The simplest option, and probably the most common for laptops or computers on a basic network, is to let a DHCP server assign IP addresses dynamically. In practice, this often results in a consistent address since both dhcpcd and dhclient initially request the same address previously assigned. If the address is unavailable then the machine gets a new one, but on small networks this may never happen.
If the DHCP server on your network requires a specific DHCP hostname before you're permitted to connect. You can enter this on the Set DHCP Hostname screen.
To use a static IP address, you must provide:
Static IP Address
- IP Address: the address of your computer, such as
192.168.1.1(for IPv4). Also, you should verify that no DHCP server on your network is set to assign that same address out as a part of its DHCP pool, or you may encounter address conflicts. - Netmask: the subnet mask for your network; often
255.255.255.0for small networks. - Gateway Address: the address of the gateway server providing internet access to your network. On small networks, this will probably be provided by your ISP while on larger networks you may use an internal server which handles the traffic. In other words, this may be an internal address like
192.168.1.1or it might be an address provided by your ISP, such as75.146.49.79 - Nameserver: most likely, you'll want to utilize DNS; in this initial setup, provide your primary domain name server. Edit /etc/resolv.conf to add secondary and tertiary servers later.
The final screen during static IP address configuration is a confirmation screen, where you're permitted to accept your choices, edit them, or even restart the IP address configuration in case you decide to use DHCP instead.
Your network configuration is now complete. The next screen prompts you to configure the startup services that you wish to run automatically upon boot. Read the descriptions that appear both to the right of the service name as well as at the bottom of the screen in order to decide whether that service should be turned on by default. These can always be modified later with pkgtool > Setup > Services.
As the startup services window warns, you should only turn on the startup services that you actually intend to use. This not only decreases boot time but makes for a more secure system.
Every computer needs to keep track of the current time, and with so many timezones how does Slackware know which one to use? Well, you have to tell it which one to use, and that's why this step is here. If your computer's hardware clock is set to UTC (Coordinated Universal Time), you'll need to select that; most hardware clocks are not set to UTC from the factory (though you could set it that way on your own; Slackware doesn't care). Then simply select your timezone from the list provided and off you go.
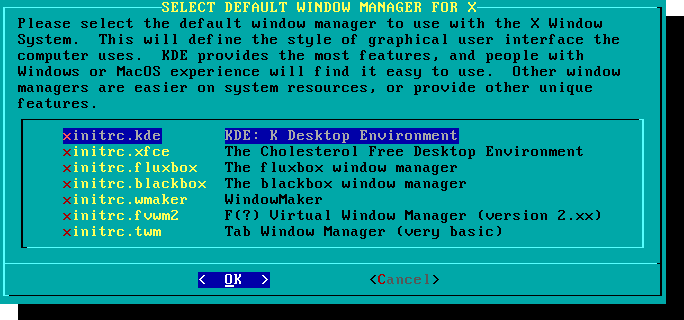
If you installed the X disk set, you'll be prompted to select a default window manager or desktop environment. What you select here will apply to every user on your computer, unless that user decides to run xwmconfig(1) and choose a different one. Don't be alarmed if the options you see below do not match the ones Slackware offers you. xwmconfig only offers choices that you installed. So for example, if you elected to skip the “KDE” disk set, KDE will not be offered.
The last configuration step is setting a root password. The root user is the “super user” on Slackware and all other UNIX-like operating systems. Think of root as the Administrator user. root knows all, sees all, and can do all, so setting a strong root password is just common sense.
With this last step complete, you can now exit the Slackware installer and reboot with a good old CTRL + ALT + DELETE. Remove the Slackware installation disk, and if you performed all the steps correctly, your computer will boot into your new Slackware linux system. If something went wrong, you probably skipped the LILO configuration step or made an error there somehow. Thankfully, the next chapter should help you sort that out.
Post Installation
When you have rebooted into your new Slackware installation, the very first step you should take is to create a user. By default, the only user that exists after the install is the root user, and it's dangerous to use your computer as root, given that there are no restrictions as to what that user can do.
The quickest and easiest way to create a normal user for yourself is to log in as root with the root password that you created at the end of the intallation process, and then issue the `adduser` command. This will interactively assist you in creating a user; see the section called Managing Users and Groups for more information.
Another important step is to make sure that your installation is up-to-date as new updates are being released that can include security fixes. To do that we can use the slackpkg tool to update the list of packages and install new updates with it.
One last thing - there will be mail in the root user's mailbox filled with useful information about package management, as well as system configuration and maintenance. You should check it with your favorite mail client. If you have not used any of the included mail clients, alpine is a good suggestion to get started quickly and easily.
Configuring Graphical Logins
Once your system is up to date and you have created your first user, you may want to configure your system to boot into X by default, with a graphical login instead of a console login. You can first test that X auto-detects your video correctly by issuing the `startx` command. If X11 starts and you end up at a desktop, you're probably good to go. Open the /etc/inittab file, as root, in your editor of choice. Change the following line:
# Default runlevel. (Do not set to 0 or 6)
id:3:initdefault:
To be this:
# Default runlevel. (Do not set to 0 or 6)
id:4:initdefault:
This sets your default run-level to 4, which is Slackware's “graphics-only” mode (with one extra tty open just in case, on vty 6). Save, and on your next reboot the system will boot into a nice graphical login.
You can manually enter run-level 4 by entering, as root, `init 4`.
To select or switch between available desktop environments run xwmconfig as root.
Adding multilib
If you just installed the 64-bit version of Slackware, you will soon discover that this is a “pure” 64-bit environment. In other words: out of the box, Slackware64 is not able to run or compile 32-bit program binaries.
Luckily, this is simple to fix. Adding the capability to run and/or compile 32-bit programs will turn your Slackware64 into a “multilib” system. Instructions can be found in the article “Adding Multilib Capability to Slackware on x86_64 Architecture” in our Wiki.
References
- Original source: http://slackbook.org/beta/#ch_install (authors: Alan Hicks, Chris Lumens, David Cantrell, Logan Johnson)
External links
Slackware 13.37: a distribution to (re)discover (in French)
This is a series of four detailed articles about Slackware, written by Kiki Novak for the french magazine Planète Linux (issues 67, 68, 69 and 70, November 2011 - May 2012).
Author's note: I do own the rights for these articles, so I've decided to link to them here. Feel free to cannibalize them as you wish, e. g. include parts of them - or the articles as a whole - in this wiki, change them as you feel inclined, quote them extensively, and translate bits of them or the whole series. To help you do this, I've included all the original files that were used in the making of these articles: original text in ODT format as well as all the screenshots in PNG format. Check out the links below the list.
-
- History of Slackware
- A few good reasons to choose Slackware
- A few good reasons not to choose Slackware
- It's not a bug, it's a feature!
- How to get Slackware
- Slackware-specific documentation
-
- Choose your boot parameters
- Select your keyboard layout
- Partition your hard disk
- Format your partitions
- Decide what you want to install
- Configure and install the bootloader
- Your mouse in console mode
- Networking and services
- Which font for the console?
- System clock and timezone
- Which graphical environment?
- A password for root
- Finish the installation and reboot
- What now?
-
- Create an initrd and use the generic kernel
- Fine-tune the LILO bootloader
- Configure the network
- Add one or more users
- Configure the sound
-
- Traditional Slackware package management
- Manage official Slackware packages using slackpkg
- Help! I can't find a package I need!
- Building a package using a SlackBuild script from SlackBuilds.org
- Manage SlackBuilds comfortably using sbopkg
- Configure the graphical server X.org
- Select your graphical environment
- Slackware in French
Original files (ODT manuscript, screenshots, etc.):