Table of Contents
Localization: Adapt Slackware to your own Language
This page contains instructions about how to adapt your Slackware installation to your own language.
Overview
Contrary to other distributions, Slackware is pretty much an English language-oriented distro. The installer is not localized - it is available in English only.
During installation you have only the choice of keyboard-layout for the console and can choose support for UTF-8 in the console (which is done in /etc/lilo.conf with a kernel-parameter).
However, it is not hard to localize your Slackware system so that it displays commands in your own language and uses a graphical desktop environment which is using your language, metrics system and other localizations.
There are several settings which more or less are independent from each other. The keyboard-layout for the console can be chosen during installation, but is independent from the keyboard-layout when X11 is running. Unicode-support (UTF-8) extends the normal ASCII table and helps to display characters which are not contained in the English language.
The environment-variable $LANG can be set system wide or “per user”. Basically, this variable defines the language that applications will use when they interact with the user.
Also it is important to distinguish if the computer boots to run level 3 (console) or run level 4 (graphical X-Window login).
The Timezone
If you need to change the timezone of your system you can simply use (as root) the tool timeconfig on the command-line. If you want, you can set the timezone manually by copying the string for your timezone from /usr/share/zoneinfo/ to the file /etc/localtime.
Example:
cp /usr/share/zoneinfo/Europe/Berlin /etc/localtime
Locale
Taken from man 7 locale:
A locale is a set of language and cultural rules.  These cover aspects such as language for
messages, different character sets, lexicographic conventions, and so on.  A  program  needs
to be able to determine its locale and act accordingly to be portable to different cultures.
The locale command will show you what languages are supported by your Linux system. Run
locale -av
to get a detailed overview. Here is an excerpt to get the picture:
locale: nl_NL           directory: /usr/lib64/locale/nl_NL
-------------------------------------------------------------------------------
    title | Dutch locale for the Netherlands
   source | RAP
  address | Sankt J<F8>rgens Alle 8, DK-1615 K<F8>benhavn V, Danmark
    email | bug-glibc-locales@gnu.org
 language | Dutch
territory | Netherlands
 revision | 1.0
     date | 2000-06-29
  codeset | ISO-8859-1

locale: nl_NL.utf8      directory: /usr/lib64/locale/nl_NL.utf8
-------------------------------------------------------------------------------
    title | Dutch locale for the Netherlands
   source | RAP
  address | Sankt Jørgens Alle 8, DK-1615 København V, Danmark
    email | bug-glibc-locales@gnu.org
 language | Dutch
territory | Netherlands
 revision | 1.0
     date | 2000-06-29
  codeset | UTF-8

locale: nl_NL@euro      directory: /usr/lib64/locale/nl_NL@euro
-------------------------------------------------------------------------------
    title | Dutch locale for the Netherlands with Euro
   source | Free Software Foundation, Inc.
  address | 59 Temple Place - Suite 330, Boston, MA 02111-1307, USA
    email | bug-glibc-locales@gnu.org
 language | Dutch
territory | Netherlands
 revision | 1.0
     date | 2000-08-20
  codeset | ISO-8859-15
A system's locale is configured using environment variables, some of them more widely used than others. The most interesting ones are :
- LANG
- LANGUAGE
- LINGUAS
- LC_COLLATE
- LC_ALL
If you read that locale(7) man page, you will see that it mentions several locale variables which can be used to change the computer's language-specific behaviour. All these variables are prefixed with “LC_”, like LC_COLLATE, LC_CTYPE, LC_MONETARY, LC_MESSAGES, LC_NUMERIC and LC_TIME, or the encompassing variable “LC_ALL” which will override all of the above if you define it. The LANG variable can also be used to override all these “LC_” variables.
This means that if you want it, then your computer can be configured to use a certain locale more or less completely. For instance, you can decide to just show command output in your own language (using the LANG variable) but keep the default sort order to the old-fashioned ASCII values (using the LC_COLLATE variable), which makes your system responses more reliable.
There is also support for UTF-8 locales, but be aware that some programs are not yet able to handle UTF-8 and will fail to run properly. In those cases, you can set LANG=C before starting them.
Exploring the Environment-Variables
The environment-variables which deal with locale-settings use values like nl_NL, the lowercase first part of the string is called languagecode whereas the uppercase second part of the string is called countrycode. The languagecode refers to the language in general whereas the countrycode refers to characteristics of each country where this language is spoken.
Example: en_EN for British English and en_US for American English.
System Wide Configuration
Slackware has a profile script which allows you to set the system's locale for all users at once (system-wide). You can simply edit this file with an ASCII editor such as nano or vi. Check out
/etc/profile.d/lang.sh
(users of C-shell and derivatives must edit /etc/profile.d/lang.csh instead).
If you want to be done with this quickly, just look for the line in that file which says:
# en_US is the Slackware default locale:
export LANG=en_US
and change the value to your own language. A dutch family would change this to
# en_US is the Slackware default locale:
export LANG=nl_NL
And if I also wanted to make the computer support Unicode text, I would change it to
# en_US is the Slackware default locale:
export LANG=nl_NL.UTF-8
Note that Slackware is not fully Unicode-prepared. Some applications (like the man pages) will not properly display Unicode text. For some languages (in particular the non-Latin ones) it is mandatory to enable Unicode support (see further down) or else the character glyphs will not be displayed (you will see nothing but small rectangles instead).
Per User Configuration
If you do not want to pre-define the locale for everyone, you can set these same environment variables for the individual user.
In that case you would not be using /etc/profile.d/lang.sh but instead define these variables in the user's shell initialization file. Bash reads different initialization files depending on being called as a login shell or as a non-login shell. When the user logs into the console, Bash is called as a login shell and sources the file ~/.profile in the user's homedirectory. Therefore one adds the line
LANG=de_DE.utf8
into ~/.profile in order to enforce a german language. C-shell users would edit ~/.cshrc instead.
Console
Note that only root is permitted to use liloconfig and pkgtool!
Setting up LILO for Unicode
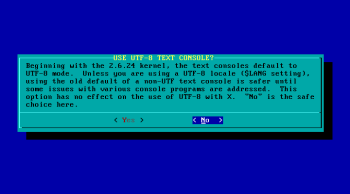
LILO setup section of Slackware installer allows you to set-up UTF-8 by default:
If you choose the default option (“No”), you can enable Unicode in the console later by appending the option “vt.default_utf8” in your lilo.conf file:
# Start LILO global section
# Append any additional kernel parameters:
append="vt.default_utf8=1"
boot = /dev/sdx
Or by using liloconfig:
liloconfig
Reboot your system to apply changes.
Note: liloconfig is also available from the “setup” section of pkgtool.
Setting the console font
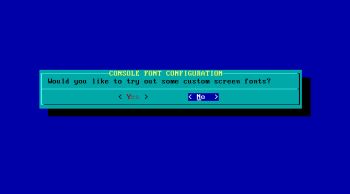
The system setup section of Slackware's installer allows you to configure a custom font:
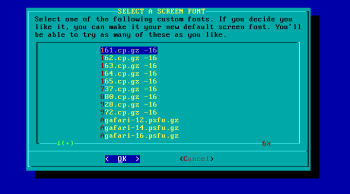
If you choose “Yes”, you'll get the option to try out and eventually select the desired font.
These settings are stored in /etc/rc.d/rc.font.
If you chose not to install custom fonts, you can do that later: either by changing/adding the font in /etc/rc.d/rc.font, or by running the setconsolefont script:
setconsolefont
Note: setconsolefont shows only a fixed list of fonts. Any additionally installed fonts won't appear on the list.
Note: setconsolefont is also available from the “setup” section of pkgtool.
Note: Console fonts are found in /usr/share/kbd/consolefonts. You can also use an absolute path as an argument.
Temporarily changing the font
You can temporarily change the console font by using the setfont utility (part of the kbd package). If you specify a non-Unicode font under Unicode console mode, setfont will try to automatically load Unicode mappings if available. Nowadays most of the fonts already contain embedded Unicode maps. For more info and additional options, see the setfont man page.
Note that setconsolefont also uses setfont internally. so this applies to it too.
setfont font
When invoked without an option, setfont loads the default font:
setfont
Loading a custom console keymap
You can use the setkeys tool to reconfigure the current keymap. For example:
loadkeys hu
Keymaps are located in /usr/share/kbd/keymaps. They usually contain some notes on encoding/additional key bindings. I.e.: “sr-cyr” is a Serbian Cyrillic keymap. It's an ISO-8859-5 keymap. Right-Shift is bound as a switch between US English and Serbian Cyrillic. Another example is the Russian keymap (UTF-8, Ctrl+Shift as a switch key).
Keymap files are compressed textual descriptions and are easily viewable with zcat. For example:
zcat /usr/share/kbd/keymaps/i386/azerty/fr-pc.map.gz | head | grep "^#"
Which will show us all the comments in the first 10 lines of the file:
# fr-pc.map for French PC keyboard (non-US 102 keys)
#
#  1997-3-5
#  Seak, Teng-Fong <seak@drfc.cad.cea.fr>
#
Temporary Unicode consoles with unicode-start/unicode-stop
If you want to set up Unicode only temporarily, you can do that by using the unicode-start and unicode-stop scripts (part of the kbd package)
unicode-start
This will back-up the current keymap definition into ~/.kbd, setup the current virtual console for UTF-8 and load the default font (LatArCyrHeb-16). You can also specify a font of your choosing by adding parameters in the invocation of the script:
unicode-start font
or:
unicode-start font unimap
For the description of font and unimap parameters and the default locations, check the setfont manual:
man setfont
When you want to get back to your previous environment, issue:
unicode-stop
Diagnostics
You can check if the current console is properly configured for Unicode.
Run stty with “-a” option:
stty -a
If you see “-iutf8” among the results, the current virtual console is not configured for UTF-8, otherwise if you see “iutf8” (without minus sign), the vc is properly configured.
Run kbd_mode without arguments:
kbd_mode
This will display the current keyboard mode (usually XLATE or UTF-8).
X11 Locales
When your computer boots into runlevel 4 and uses one of the login managers (for example: gdm, kdm or xdm), the ~/.profile file is sourced in any case. This means if your system uses “per user” settings (as described above) for $LANG, these settings remain valid in X11. The window managers and desktop environments (except KDE) should then come up with menus in your language.
When you run startx from runlevel 3 your “$LANG” settings from the console are applied to the window manager.
X11 keyboard setup
The keyboard layout for the X-Window system is independent from the keyboard layout of the textual console. The following settings are desktop agnostic.
Keep in mind: some desktop environments might use their own layout settings, practically overriding these settings. Most notable example is KDE.
If you want a non-English keyboard layout with X, you'll have to adapt the config files. The generic config files are found in /usr/share/X11/xorg.conf.d/ and those you want to use, you'll have to copy to the /etc/X11/xord.conf.d/ directory.
The X-server reads only those config files within the /etc/X11/xorg.conf.d/ directory!
cp /usr/share/X11/xorg.conf.d/90-keyboard-layout.conf /etc/X11/xorg.conf.d
Then open the file with your favorite text editor and find the line
Option "XkbLayout" "us"
Change “us” to your language code, for example “de” for German. Additionally you may want to edit the line
Option "XkbVariant ""
and insert your favorite keyboard-variant, for example “nodeadkeys”
Using multiple keyboard layouts
Why is this useful?
- Several people use one computer but prefer different keyboard layouts.
- People use another script (e.g. Greek or Cyrillic), they'll have to switch to English layout always when they want to type a command.
Therefore this configuration can be very important although many people will never have to use it.
You can also specify more than one keyboard layout:
Option "XkbLayout" "us,rs"
That also includes using different variants:
Option "XkbLayout" "us,rs,rs"
Option "XkbVariant ",latin,"
In this example we configure three keyboard layouts - US English, Serbian Latin and Serbian Cyrillic. Note the same number of commas as in the XkbLayout option. The empty “fields” mean we are using the default variants for the layouts without specified variant.
Easy layout switching
You can also specify a shortcut to easily change the layout.
Option "XKbOptions" "grp:alt_shift_toggle"
This will change the layout by pressing on Alt+Shift.
There are also other group switching combinations you can setup 1):
- grp:toggle - right alt
- grp:lalt - left alt
- grp:shifts_toggle - both shift keys pressed at the same time
- grp:alts_toggle - both alt keys pressed at the same time
- grp:ctrl_shift_toggle - ctrl + shift
- grp:alt_shift_toggle - alt + shift
- grp:alt_space_toggle - alt + space
- grp:ctrl_alt_toggle - ctrl + alt
- grp:caps_toggle - capslock
- grp:shift_caps_toggle - shift + capslock
- grp:lwin_toggle - left Win key on “Windows” keyboards
- grp:rwin_toggle - right win key on “Windows” keyboards
- grp:menu_toggle - context menu key on “Windows” keyboards
- grp:lctrl_toggle - left ctrl
- grp:rctrl_toggle - right ctrl
Changing the keyboard layout with setxkbmap
The following description addresses those users who need “per user” settings for their keyboard-layout in X11. This means that the system wide settings for X11 are different from their needs and it is not possible to change them. Read the man page if you need detailed information.
You can find out your current settings of the keyboard-layout in X11 with the command
setxkbmap -query
An overview of setxkbmap is available with
setxkbmap -help
The language and variant of the keyboard layout can easily be configured with (the following example lines refer to German language with variant “nodeadkeys”)
setxkbmap de
setxkbmap -variant nodeadkeys
Where to place the code?
If your system boots into runlevel 3, which means that you login on the console and then startx, you can put the above code at the top of your ~/.xinitrc.
If your system boots into runlevel 4 and you login with a login manager like gdm, kdm or xdm, you should insert it to your ~/.xprofile. This file is sourced by any of the login managers. Please note that ~/.xprofile isn't created by default, you must create it by yourself.
Desktop Environments
Desktop environments, just like all other programs, will by default adapt themselves to the locale you have defined before starting your X-Window session. However, you do not normally install KDE localization packages. The standard KDE installation is English-only and localization packages can be found in the KDEI package series. There you will find localization packages for Calligra as well - the KDE Office Suite.
Localization for KDE
When you're running KDE you'll have to install the language-package (l10n-packages) for your language. The KDE l10n-packages reside in the kdei series. If you download Slackware from a mirror, be sure not to download all of the l10n-packages but only the ones you need, there's one for KDE and one for Calligra for each language.
Note: The following settings are not necessary when you startx from runlevel 3 and have your language settings already applied. In this case KDE takes the settings from your environment.
When the l10n-package is installed and you start KDE for the first time, open the launcher and click on System Settings.
In the System Settings click on Locale and select your country in the drop-down menu.
Afterwards go through all the tabs and select your language, number-format, currency-format, calendar-format, format for date & time and in “other” the settings for page-size and measurement units.
You can also configure the spelling-checker in this window.
When KDE is configured for your language, the office-suite Calligra starts automatically with the correct language-settings, provided that you've installed the Calligra language-package.
Keyboard layout
We have a separate page in our Wiki for this: Keyboard Layout in KDE
Xfce localization
XFCE doesn't have a GUI tool for internationalized settings. It will pickup your locale settings from the environment. Also, there are no separate packages for locale data - everything is included in the main XFCE packages. Keep in mind most of XFCE localizations are seriously lagging behind those of several most popular languages. For more information on how to help localizing XFCE in your language you might take a look at Xfce's localization page.
Keyboard layout
Please consult our Wiki page Keyboard Layout in XFCE
Dictionaries and Spelling checkers
Spelling checkers
By default Slackware comes with aspell, ispell and hunspell. The dictionary for English is already installed. For other languages you can find the dictionaries on the DVD or the mirrors in the /extra/aspell-word-lists/ directory.
Dictionaries for Applications
Thunderbird and Firefox come with spelling checkers, you can install the dictionary for your language with the “Add-Ons” menu.
For people who write mails in various languages there's also a “dictionary-switcher” available for Thunderbird. You can search in the “Add-Ons”-menu of Thunderbird.
If you have LibreOffice installed from AlienBob's page there are also language-packages available. If you have installed the l10n-package for your language, this provides also a dictionary for the spelling checker.
Applications
Most programs in Slackware come with multi-language support out of the box. They will adapt their behavior according to the locale you have defined.
There are a few notable exceptions. Slackware's Mozilla packages for Firefox, Thunderbird and Seamonkey are not localized. They are examined below.
Some of the bigger 3rd party applications like OpenOffice and LibreOffice are offered with their own set of language packs.
Mozilla-Firefox
AlienBob provides an l10n SlackBuild.script which seems to be the most convenient way to localize Firefox.
It is also possible to do it pretty much the same way as with Mozilla-Thunderbird (see below). After installing the xpi-file you type about:config into the address-field Firefox in order to open the config-editor. There you type useragent and change the useragent.local to your language. This is in more detail explained for Thunderbird.
Mozilla-Thunderbird
If you want the menus in the mail client Thunderbird in your own language, you'll have to download the xpi-file for your language from the Mozilla-site.
Problem with Thunderbird is that one needs a new localization-file for (almost) every new version. Note the directory-structure of the Mozilla-site. For any version you'll have to follow their directory-structure from ftp://ftp.mozilla.org/pub/thunderbird/releases/ go to /VERSIONNUMBER/LINUX-i686 or x86_64/xpi/
They have different xpi-files for 32bit and 64bit Versions, but I tried it and each works for both versions.
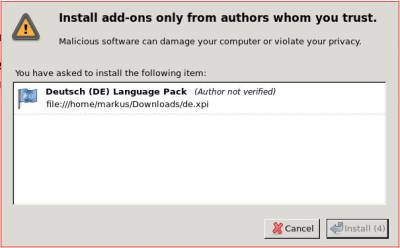
Installation of the xpi-file is done “per-user”. Open in the menu Tools→Add ons and then click on the little arrow on the right hand top of the page beneath the search-field.
Select Install Add on from file… and then navigate to the downloaded xpi-file.
Thunderbird needs to be restarted afterwards.
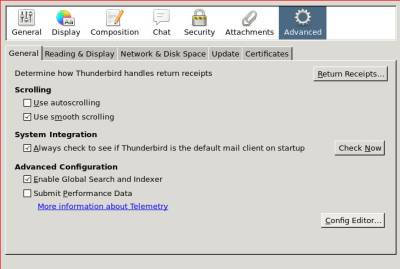
The last step has to be done only once for any user account, this change remains valid also if you upgrade Thunderbird. You'll have to edit the configuration. In the menu open Edit and select in Preferences the tab Advanced.
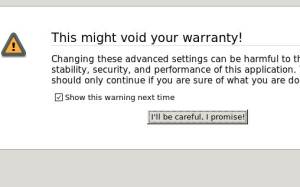
Open the Config Editor… and click on the I'll be careful, I promise! button.
Then the Config Editor opens and you can type useragent into the field in the top of the page.
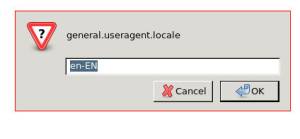
In the line general.useragent.locale double click on en-EN
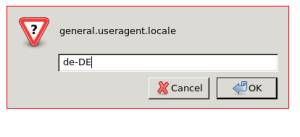
and change to your own language, for example de-DE.
Afterwards restart Thunderbird, now you should have the menu in your language.
Seamonkey
You'll find a directory langpack on the Mozilla-Mirror in the directory for your release. These are xpi-files and have to be installed similar to Thunderbird's xpi-files (described above). After installing the xpi-file you type about:config into the address-field of the Seamonkey-browser in order to open the config-editor. There you type useragent and change the useragent.local to your language. This is in more detail explained for Thunderbird.
LibreOffice
AlienBob provides Slackware-packages for LibreOffice and additionally the l10n-packages for it.
Further Reading
For those of you who are interested in additional information, here are some links.
Thanks to Didier Spaier for contributing.
Sources
- Originally written by Eric Hameleers
- Contributions by Bojan Popovic
- Contributions by Markus Hutmacher
/usr/share/X11/xkb/rules/base.lst
