[2025-jun-17] The SlackDocs Wiki has moved to a new server, in order to make it more performant.
Table of Contents
Slackware ARM : Honeycomb LX2K Workstation Installation Guide
Slackware ARM project web site | Forum | Slackware ARM development documentation | Slackware ARM installation guides
| Target | |
|---|---|
| Platform | AArch64/ARM64 |
| Hardware Model | Solid-Run Honeycomb LX2K (lx2160Acex7) Workstation |
| Document Version | 1.04, Apr 2025 |
| Authors | Brenton Earl <el0226@slackware> , Stuart Winter <mozes@slackware> |
Supporting the Slackware ARM Project
If you like what we're doing here, please consider becoming a patron.
Introduction to the HoneyComb LX2
The Honeycomb LX2K ARM Workstation is a mini ITX platform manufactured by SolidRun. The Honeycomb is ARM SystemReady certified and it has great functionality right out of the packaging. Support is mature and and was added into the Linux kernel in version 5.14. This hardware is highly extensible, adaptable, and can be used for many roles. It is available as a Workstation or in a 1U server chassis form factor.
Most AArch64 boards do not stay relevant for more than a few years due to advances in technology. This is not an issue with the Honeycomb LX2K. The SFP+ fiber ports, SATA 3.0, NVMe interface, PCIe slot, and power efficiency are exceptional. It excels at edge computing, is great as a development platform, and will function well as a network appliance. As a Workstation it is ideal for developers working on the Aarch64 architecture due to all these reasons. It is versatile in that it can be configured to match many hardware, network, and software profiles.
The guide covers installation steps, including setting up the hardware, flashing firmware, and installing Slackware AArch64.
Honeycomb LX2K Main Board Specifications
| Processor | NXP Layerscape LX2160A 16-core Arm Cortex A72 up to 2GHz |
|---|---|
| Memory | Up to 64GB dual 64 bit SO-DIMM DDR4 |
| Storage | 64GB eMMC on board, MicroSD, SATA 3.0 x 4 |
| Expansion card I/Os | 1 PCIe x8 Gen 3.0, open slot (can support x16) and M.2 interface |
| Networking | 4 x SFP+ ports (10GbE each) 1 x 1GbE copper (RJ45) |
| Peripherals | USB 3.0 x 3, USB 2.0 x 3, USB to STM32 for remote management |
| Cooling | Heatsink and Fan included |
| Temperature | Commercial: 0°C to 70°C |
| Dimensions | PCBA: 170 x 170mm |
More specifics can be found here.
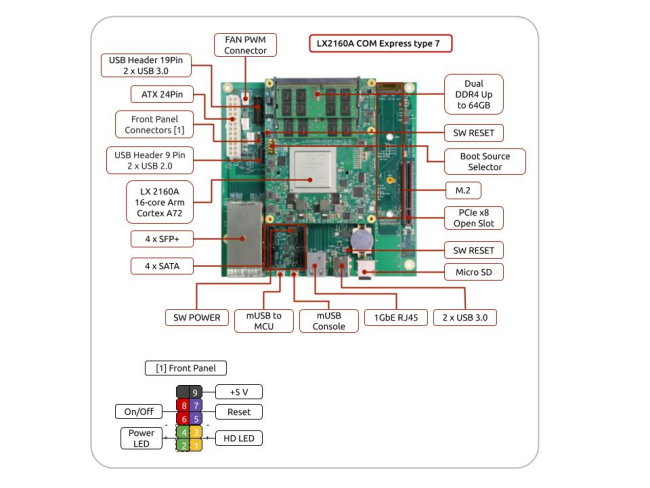
Board Layout
External Connectors
Help and Support
Please post questions to the Slackware ARM forum.
Caveats
- Presently this Hardware Model is only supported in 'headless' mode. There is no graphics support, as this hardware is used for building the Slackware AArch64 distribution and is fully managed remotely via SSH and through the serial console.
- There are some stability issues with the USB bus, which appear to be Kernel or firmware related; but unless you're using USB storage this shouldn't pose an issue.
Video Tutorial
Managing the boot firmware
Installation Lifecycle
The Installation consists of a number of distinct stages:
- Acquiring all required hardware
- Setup of the HoneyComb LX2 hardware
- Downloading and verifying the Slackware Installation and UEFI firmware assets
- Writing the Slackware Installer to a USB thumb drive
- Writing the UEFI firmware to a Micro SD card
- Initial hardware configuration of the HoneyComb LX2
- Booting the Slackware Installer
- Installing Slackware
- Completing the installation
- Adjusting the hardware configuration of the HoneyComb LX2
- Booting the Slackware OS
- Post installation configuration and tweaks
Hardware Recommendations
The case, power supply, Micro USB to Serial adapter, SSD storage, network components, and GPU represent a general, non-specific hardware configuration utilized during development. While not mandatory, these components have been reliably used for developing Slackware AArch64 on the Honeycomb and other Hardware Models over an extended period.
| Tested Hardware during Development | Notes | |
|---|---|---|
| Memory | 2x Kingston HyperX 16GB SO-DIMM DDR4 (up to 2x 32GB) - Board supports ECC too. | Specifically tested by SolidRun |
| NVME | Not currently in use | Could be used as the Root Drive (but hasn't been tested in Slackware). |
| Root Drive | Kingston 120GB A400 SATA 2.5“ SSD (SA400S37) | Could be added to the data RAID array |
| Data Storage | 3x Kingston 500GB A400 SATA 2.5” SSD (SA400S37) | RAID data array |
| SD Card | Gigastone 32GB Micro SD Card (UHS-I U1 A1 Class 10) | Great performance and mostly reliable |
| USB Memory | SanDisk 16GB Cruzer USB 2.0 Flash Drive or similar | Stores installer image on first installation |
| GPU (PCIe port) | AMD RX550 4GB GPU | works out of the box with Slackware AArch64 and has 1 DVI and 1 HDMI port. NVidia GPUs are not recommended. No driver for aarch64 |
| Monitor | Modern LCD or LED | Any monitor that uses HDMI or DVI inputs |
| Network | Asix USB 3.0 to Ethernet adapter | It was reported some time ago that the On-board ethernet port does not work until kernel firmware is installed. |
| Network | Cat6 Ethernet cable | 6 Feet in length recommended for the on board Realtek Ethernet port |
| SFP+ / Fiber | HiFiber 10Gb SFP+ RJ45 Module, 10Gbase-T Ethernet SFP+ Copper Transceiver (10G/5G/2.5G/1.25G) | Fiber connection untested without the RJ45 Module listed |
| Case | Rosewill FBM-X2 Micro ATX Mini Tower Computer Case | There is most definitely a better case. The USB ports on it are unreliable. |
| Power Supply | EVGA 100-BR-0450-K1 80+ Bronze 450W | May be a bit over kill. Reliable throughput. |
| Serial | Generic Micro USB to USB male cable for serial connection | Recommendations welcome for this guide |
| Cooling | A generic fan on the heatsink, above the CPU | Alternatives welcome. See Known Issue and Limitations at the end of this document |
| USB thumb drive | 16GB minimum capacity | This will be used temporarily to contain the Slackware Installer |
The HoneyComb can be purchased directly from Solid-Run, online at https://shop.solid-run.com . Shipping takes several weeks as it comes from abroad and goes through customs. It is recommended that the board, memory and SD card be purchased as a bundle. Solid-Run certifies that the Kingston HyperX 32Gb RAM module has been thoroughly tested.
Alternative System Memory Modules
The RAM available from Solid Run (see the table above) is quite expensive.
A lower cost alternative is the 2600MHz 32GB 2x16GB 'Kingston Fury Impact'. It is thoroughly tested as the Slackware AArch64 primary build host for over 2 years, but note that we offer no guarantees! This RAM was chosen by comapring it with the datasheet for the RAM offered by SolidRun.
It can be purchased from the Kingston Online Store and is also available on Amazon.
Downloading the assets
In this section, we'll download the Slackware assets and UEFI firmware required for the installation.
1. Downloading the Slackware Linux AArch64 Installer
Open a shell on the Linux Host Computer.
Prepare a directory to hold the downloaded assets
We'll download the Slackware Linux distribution into a directory named 'slackware'.
$ cd ## this returns to the root of your home directory
$ mkdir slackware
$ cd slackware
Determine where you are within the Host Computer's Filesystem
$ pwd
/home/mozes/slackware
Installing the Slackware ARM GPG key
The Slackware ARM GPG key will be used to verify your downloads.
$ curl -sSL https://www.slackware.com/infra/keys/arm/GPG-KEY | gpg --import -
Set the version of Slackware AArch64 to download
At the time of writing, the only version available is 'current'.
$ SLKVER=current
Set the Internet media distribution server
If you are using a mirror server rather than the master Slackware ARM server, set it here. The format is: <hostname>::<rsync module name>
$ SLKSRV=ftp.arm.slackware.com::slackwarearm
Download the Slackware Linux Installer
$ rsync -PavL $SLKSRV/platform/aarch64/bootware/installer-aio/slackwareaarch64-${SLKVER}/aarch64_generic.iso.asc slk-aarch64_generic.iso.asc
$ rsync -PavL $SLKSRV/platform/aarch64/bootware/installer-aio/slackwareaarch64-${SLKVER}/aarch64_generic.iso slk-aarch64_generic.iso
The Slackware Installer images are approximately 5 GBytes in size.
Verify the Slackware Installer image
Verify the digital signature of the Slackware Installer:
$ gpg --verify slk-aarch64_generic.iso.asc
The output will be similar to this. You are looking for 'Good signature from Slackware ARM…'
gpg: assuming signed data in `slk-aarch64_generic.iso'
gpg: Signature made Wed 24 Nov 2021 06:07:44 PM BST
gpg:                using RSA key F7ABB8691623FC33
gpg: Good signature from "Slackware ARM (Slackware ARM Linux Project) <mozes@slackware.com>" [unknown]
gpg: WARNING: This key is not certified with a trusted signature!
gpg:          There is no indication that the signature belongs to the owner.
Primary key fingerprint: 36D3 7609 2F12 9B6B 3D59  A517 F7AB B869 1623 FC33
2. Download the UEFI firmware
Download the UEFI firmware that matches your physical hardware configuration. For our purposes, we only need to focus on the clock speed of the RAM.
| RAM Clock Speed (GHz) | UEFI firmware image file name |
|---|---|
| 2400 | lx2160acex7_2000_700_2400_8_5_2 |
| 2600 | lx2160acex7_2000_700_2600_8_5_2 |
| 2900 | lx2160acex7_2000_700_2900_8_5_2 |
| 3200. | lx2160acex7_2000_700_3200_8_5_2 |
The RAM available from SolidRun (see the table in the Hardware Recommendation section above) runs at 3200Mhz.
The alternative RAM option runs at 2600Mhz.
In this example, we will download the UEFI firmware image that is configured for the 2600MHz RAM.
Set the UEFI firmware image name
$ UEFIFW=lx2160acex7_2000_700_2400_8_5_2
Download the firmware
$ rsync -PavL $SLKSRV/platform/aarch64/bootware/recovery/lx2160acex7/${UEFIFW}.img.xz uefifw.img.xz
$ rsync -PavL $SLKSRV/platform/aarch64/bootware/recovery/lx2160acex7/${UEFIFW}.img.xz.asc uefifw.img.xz.asc
Verify the UEFI firmware image
$ gpg --verify uefifw.img.xz.asc
You should see a good signature message, similar to what appears during the verification of the Slackware Installer image.
Writing the assets
We'll now write the Slackware Installer to the USB thumb drive, and the UEFI firmware to the Micro SD card.
Elevate yourself to root
On your Host Computer, obtain root:
$ su - ## Note the hyphen - it's required
Enter the directory into which the Slackware assets were downloaded previously:
# cd ~mozes/slackware ## Substitute with the path you noted earlier
Write the UEFI firmware to the Micro SD card
# xzcat uefifw.img.xz | dd status=progress conv=fdatasync of=/dev/XXX ## Substitute/dev/XXX with the correct block device
# sync
Remove the MicroSD card from the Host Computer
You may now disconnect the USB adapter/remove the Micro SD card from the Host Computer.
Insert the USB thumb drive into the Host Computer
Now insert the USB thumb drive into your Host computer, and determine which block device has been assigned to it.
Write the Slackware Installer to the USB thumb drive
# dd status=progress bs=4M iflag=fullblock if=slk-aarch64_generic.iso of=/dev/XXX ## Substitute/dev/XXX with the correct block device
# sync
Remove the USB thumb drive into the Host Computer
You may now remove the USB thumb drive from the Host computer.
Preparing for the Installation
HoneyComb LX2 Configuration
Before proceeding with powering on the HoneyComb LX2 and installing Slackware, the HoneyComb LX2 needs to be configured to locate the UEFI firmware on the Micro SD card, and the USB to Serial cable needs to be connected to your Linux Host Computer.
Boot Source Select Configuration
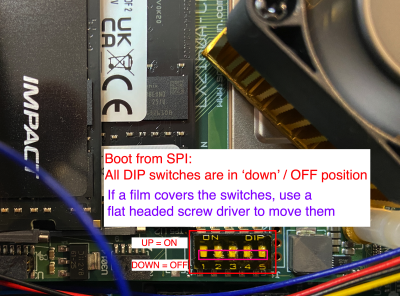
A DIP switch controls the order in which the HoneyCombLX2 scans its storage devices when searching for UEFI firmware.
It is found between the processor and the ATX input for the power supply.
The DIP switch is discussed further in the vendor documentation here.
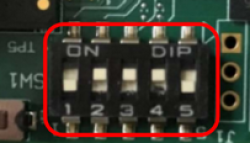
The following table is a reference for the DIP switch configuration. Switch number 5 is disabled and unused.
| Boot media | Switch 1 | Switch 2 | Switch 3 | Switch 4 | Switch 5 |
|---|---|---|---|---|---|
| SD | OFF | ON | ON | ON | X |
| eMMC | OFF | ON | ON | OFF | X |
| SPI | OFF | OFF | OFF | OFF | X |
For the initial installation of Slackware, you need to configure it to boot from 'SD', as shown in the image below:
Insert the Micro SD card
Insert the Micro SD card that contains the UEFI firmware.
The Micro SD port is located on the backside of the board.
Plugin the USB thumb drive
Plug the USB thumb drive that contains the Slackware Installer into the lowest USB port on the back of the main board.
Connect the USB to Serial connector
Connect the Micro USB end of the adapter cable to the honeycomb Micro USB port, then plug the USB-A connector into your Linux host computer.
This will be used to interface with the HoneyComb LX2 both during the installation of Slackware and upon booting the newly installed Operating System.
Set up Remote Access over the Serial port
Open a serial console to the HoneyComb LX2
The UEFI firmware configuration and installation of Slackware will be conducted through the serial console.
On your Linux Host Computer, open a console to the HoneyComb LX2.
The easiest way to do this is as root:
$ su -  # switch to the root user
# screen /dev/ttyUSB0 115200
Initial Firmware Configuration
You'll now perform a one-off firmware configuration.
Power On the HoneyComb LX2
Turn on the Honeycomb and wait at the serial console on your Host Linux computer.
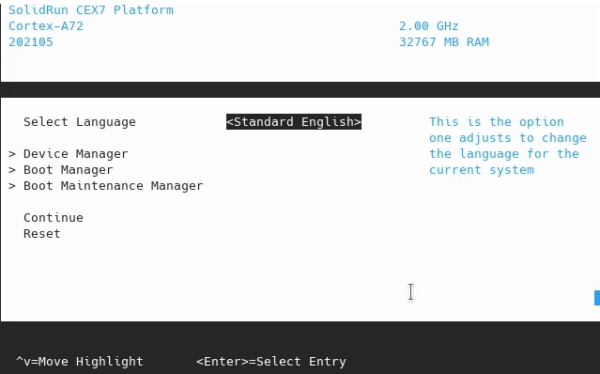
Soon after boot, you'll be prompted to press the Escape key. This will open the UEFI firmware interface. It should be familiar if you have used a BIOS or UEFI interface on the x86 or x86_64 architectures.
A screen containing the UEFI menu will be displayed.
Configure Hardware Determination Method
The firmware needs to be configured to use 'Device Tree' to map the hardware.
Select Device Manager from the menu:
Select O/S Hardware Description Selection
Select Device Tree from the menu.
Now press F10 to save the settings.
Press ESC twice to return to the first menu
Installing Slackware
Remaining within the firmware screen, you'll now select to boot the Slackware Installer from the USB thumb drive.
Select storage to boot the Slackware Installer from
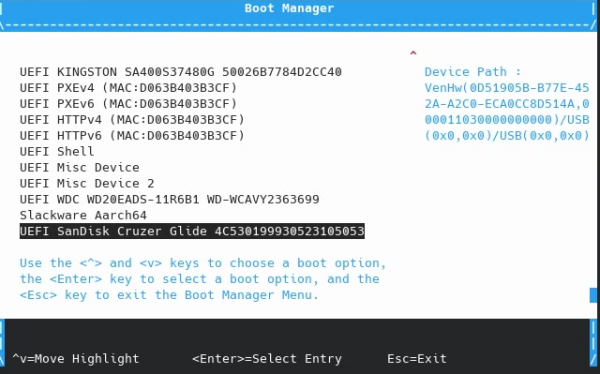
Select the Boot Manager menu option.
- Select the USB thumb drive.
- In this case it is the UEFI SanDisk Cruzer Glide menu option.
- Press the Enter key.
Booting the Slackware Installer
The boot options are as follows:
- Headless: Serial console access
- Headed: HDMI or DVI with a monitor
- Return to the UEFI Firmware interface to adjust settings
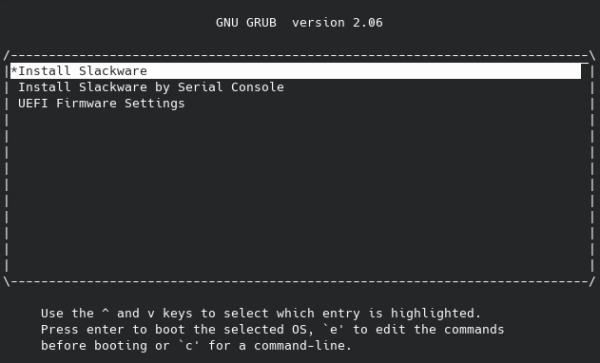
Press ENTER on the menu item Install Slackware on the HoneyComb LX2
ESC key
Press ENTER on the menu item Install Slackware [headless: serial console enabled]
Installer setup
The Slackware Installer will boot and present you with a shell prompt, ready to begin the installation process.
Disk Partitioning
An EFI partition is required for the UEFI firmware and GRUB boot loader to load Slackware AArch64 on the Honeycomb. It is required that the EFI partition be no less than 100 MB and recommended to be no greater than 300 MB. There are many partition layouts possible and many variations. In this guide it is assumed that one SATA 3.0 solid state drive (SSD) be partitioned with an EFI partition, a swap space, and the root partition. Finally, the partition table should be of type gpt.
Clear the disk label to assure the drive is empty:
dd if=/dev/zero of=/dev/sda bs=1M count=10
Launch the fdisk partitioning tool
fdisk /dev/sda
Set the disk label type
Use the “g” option first to use a GPT disk label.
msdos disklabel. Use GPT.
Create EFI system partition
Create the 1st partition and set the type to UEFI
Create the Linux Swap partition
Create the Linux file system for the Operating System
Verify the partition table layout
Write the partition table
Installation
Launch the Installer
Set Key map
Set Swap space
If you're following the guide, you should select the options as displayed in the screen shots below:
Select root partition
Select file system type for root partition
Format the EFI boot partition
Select Installation Media
Whilst other media installation (locally mounted directory, NFS, HTTP and others) can be selected, the recommendation is to accept the defaults, installing the packet set bundled with the Slackware Installer.
Package Series Selection
The next menu will ask you which Slackware package series you wish to install. A full installation is highly recommended. Below is an example of packages being installed.
Package Installation
The packages will now install. This typically takes between 30-40 minutes and can be left unattended.
Write Boot Loader Firmware to SPI Flash
Following further into the installation process you will be asked to upgrade or install the UEFI firmware. It is a requirement of this guide that the firmware be installed into flash memory. If you choose to forego this option, you are in marginally unsupported territory. Below, the screen shots are fairly self explanatory.
1. Select “Yes” to start the flashing process.
2. Select the hardware configuration profile for your system.
3. Next you will select an option from a list of available firmware images
4. Confirm the selection to advance or Abort your selection to bail out of the flashing tool.
5. Following that, the firmware will be written to SPI flash. Do not cancel it, shut down your machine, or interrupt this process. The SPI flash chip will be erased first. After that the firmware will be written to memory.
6. Finally, you will be notified of the success or failure of this process.
Mouse Configuration
Network Configuration
Provide the host name and the domain name. In this guide, the host name is honey and the domain arm.slackware.com.
If you do not have a local domain name on your network, common best practices are local or example.com as the domain name.
Configure Services to start
You can configure the services to start at boot time. The default list is suitable for most use cases, but you may want to start rc.rpc if you plan on using NFS.
These services can be configured either manually by changing the permissions on the rc scripts within /etc/rc.d, or by running the scripts from the pkgtool utility once you've booted into the Operating System.
Configure Screen Fonts
headed configuration (local monitor and keyboard), you should configure the appropriate key map. If you're only using it over serial port or SSH, you can skip setting fonts.
Configure Clock
Configure default vi
Configure default Window Manager
headed configuration (local monitor and keyboard)
Set root Password
Finishing Up the Installation
Choose to power off the HoneyComb rather than reboot. This is required as you will need to physically adjust the DIP switch settings that control the boot order.
Boot Source Select Configuration
The DIP switches need to be changed to make the SPI flash be the location from which the HoneyComb LX2 will boot its firmware.
Firmware Configuration for running the Operating System
You will now perform the final firmware configuration that will enable the machine to boot the Slackware Operating System.
- Remove the USB thumb drive containing the Slackware Installer
- Power on the HoneyComb.
When you are prompted, press the Escape key (you may need to press it a couple of times):
Use the cursor keys to scroll down to Boot Maintenance Manager
Press Enter on Boot Options
Press Enter on Change Boot Order
Press Enter to bring up the selection menu.
Use the cursor keys within the menu to locate the block storage device on which you installed Slackware. In this example it's a Kingston SSD:
- Use the '-' or '+' keys to change the position of your selected storage device so that it appears at the top of the menu.
- Press Enter to confirm its position in the menu
Ensure that your selected block storage device is at the top of the menu. If not, press Enter again
Press F10 to bring up the 'Save Settings' dialog, and press Y to confirm.
Return to the main menu.
You'll need to press ESC a few times (note: the menu has a second or more latency before it responds)
Finally, use the cursor keys to select 'Reset' and press Enter.
Booting the Slackware Operating System
This time do not interrupt the boot process by pressing the ESC key. You will be presented with a GRUB menu very similar to the menu offered by the Slackware AArch64 installer image.
The system will now boot into the OS.
Post Installation Configuration
There are a few post-installation configuration tasks to complete.
Add a plebeian user
You should add a plebeian (non-root) user using the adduser tool.
This is documented here.
NTP (Network Time Protocol) setup
If you want to configure NTP, see set time from an NTP Server.
Managing Slackware on the HoneyComb LX2
Keeping the Slackware OS up to date
One of the preferred tools to keep your system up to date is slackpkg.
Loading Additional Linux Kernel Modules within the OS Proper
Often Kernel modules for discovered hardware will be automatically loaded, but occasionally you will need to manually configure the loading of some modules.
/etc/rc.d/rc.modules.local
This file is a shell script that is run as one of the last steps before the OS has fully booted. You can enter modprobe commands here to load the specific modules you require.
Configuration files within the directory /lib/modprobe.d/ can be used to configure the parameters of the modules. Existing files within that directory serve as reference examples should you need them.
Loading Additional Linux Kernel Modules early in the boot sequence
There are a number of peripherals that may require Kernel modules loading early on in the boot sequence. An example of this would be RTCs (Real Time Clocks) or storage controllers that are required to access the file systems on which the OS lives.
To load Kernel modules during the early boot sequence, read:
/boot/local/README.txt
As root, the easiest way to begin is by renaming the example script:
mv /boot/local/load_kernel_modules.post.sample /boot/local/load_kernel_modules.post
Then add the appropriate module loading commands to: /boot/local/load_kernel_modules.post
You can also add shell code here to initialise a peripheral - writing something to the peripheral's Kernel interface, for example.
Use a graphical login manager
If you prefer to use a graphical login manager, you can configure the default runlevel as 4:
su -
sed -i 's?id:3:?id:4:?g' /etc/inittab
reboot
headed (monitor and keyboard) configuration
Customising the Slackware Linux Kernel
If you'd like to customise the Linux Kernel, the easiest way is to follow the HOWTO guide and use the Slackware AArch64 Kernel build script to create new packages.
Reducing Boot Time
Slackware AArch64 ships with a generic OS InitRD (Operating System Initial RAM Disk - the environment that prepares the machine to boot the Operating System Proper), so as to support a wide range of Hardware Models.
However, this isn't the optimal setup once the Slackware OS has been installed because the generic OS InitRD typically exceeds 40MB, which in some cases can add a couple of seconds to the boot time whilst it's loaded from the SD card.
The os-initrd-mgr (Operating System Initial RAM Disk Manager) tool has an option to synchronize the OS InitRD's Kernel modules with only those presently loaded within the Operating System.
To do this:
$ su -c 'os-initrd-mgr --sync-loaded-kmods' - # note the final -
This option isn't the default, but you can make it so by following the instructions within /etc/os-initrd-mgr.conf.sample
This way when you upgrade the Kernel packages in the order described above, it'll automatically synchronize the modules.
For example, when running Linux 5.17.1, upgrading to 5.17.2 will work; but an upgrade of Linux 5.17.1 → 5.18.1 will require a reboot then to run os-initrd-mgr again to re-sync.
a/kernel package (and unset the setting if you configured it in /etc/os-initrd-mgr.conf).
Installing extra Software
Slackware comes with a good base of software applications, but there are plenty more available in the Open Source Ecosystem.
The best way to add new software is to use the build scripts from SlackBuilds.org.
Managing the Boot Loader firmware
During the Slackware installation process, you flash the firmware to the SPI flash. Occasionally, updates will be made available to the firmware to address bug fixes and provide improvements.
Slackware provides a package hwm-bw-lx2160acex7 within the a series that contains the latest boot firmware and contains the bootloader-flash-lx2160acex7 tool to manage the upgrade life cycle.
Upgrading the Boot Loader firmware
- Upgrade to the latest available version of the package
hwm-bw-lx2160acex7(usingslackpkgas described within this document). - As root, run the
bootloader-flash-lx2160acex7tool.
In this example we'll run the Boot Loader management tool as the root user using the su tool:
$ su -c 'bootloader-flash-lx2160acex7' - # You must include the trailing '-' character
The flashing tool will indicate whether a new version of the firmware is available, and will offer to flash it. The process is the same as described earlier within this installation guide.
Reinstalling Slackware
After installing Slackware using this guide, you can write the Slackware installer to an SD card instead of a USB stick and boot from it. This approach is more convenient than using a USB thumb drive, as it requires no physical adjustments. The SD card can remain permanently seated in the HoneyComb LX2, allowing the entire process to be performed remotely without power cycling or physically interacting with the hardware.
This is possible because the firmware has already been installed in the SPI flash.
There is no need to change the DIP switch settings or even power off the HoneyComb in order to perform a reinstallation.
Write the Slackware Installer to the SD card
As root, write the appropriate Slackware Installer to the SD card:
$ IMG=honeycomb_lx2160acex7-aio-slackwareaarch64-current.img.xz # replace with appropriate Installer image version
$ xzcat $IMG | dd of=/dev/mmcblk0 bs=8M iflag=fullblock status=progress
$ sync
$ reboot
Press ESC to enter the firmware menu:
Select Boot Manager
Choose the appropriate boot option from the menu. Ensure that the selected device is identified as SD at the top right of the screen.
Boot the Slackware Installer:
Once the installation is complete, you can reboot the HoneyComb from the installer (there is no need to power off the HoneyComb, as is required in the initial installation).
Useful Guides and Resources
Known Issues and Feature Gaps
NVMe Suggestions
- Recommendations for supported NVMe M.2 storage are welcome.
More details on the development Road Map here.

