Table of Contents
Slackware ARM project web site | Forum | Slackware ARM development documentation | Slackware ARM installation guides
Slackware ARM on a Honeycomb LX2K Workstation
| Target | |
|---|---|
| Platform | AArch64/ARM64 |
| Hardware Model | Solid-Run Honeycomb LX2K (lx2160Acex7) Workstation |
| Document Version | 1.01, January 2024 |
| Author | Brenton Earl <el0226@slackware> |
| Contributors | Stuart Winter <mozes@slackware> |
Video Tutorial
TODO: add firmware video link here
Video tutorial is here.
Summary
The Honeycomb LX2K ARM Workstation is a mini ITX platform manufactured by SolidRun. The Honeycomb is ARM SystemReady certified and it has great functionality right out of the packaging. Support is mature and and was added in to the Linux kernel in version 5.14.y. This hardware is highly extensible, adaptable, and can be used for many roles. It is available as a Workstation or in a 1U server chassis form factor.
Most Aarch64 boards do not stay relevant for more than a few years due to advances in technology. This is not an issue with the Honeycomb LX2K. The SFP+ fiber ports, SATA 3.0, NVMe interface, PCIe slot, and power efficiency are exceptional. It excels at edge computing, is great as a development platform, and will function well as a network appliance. As a Workstation it is ideal for developers working on the Aarch64 architecture due to all these reasons. It is versatile in that it can be configured to match many hardware, network, and software profiles.
Help and Support
Please post questions to the Slackware ARM forum.
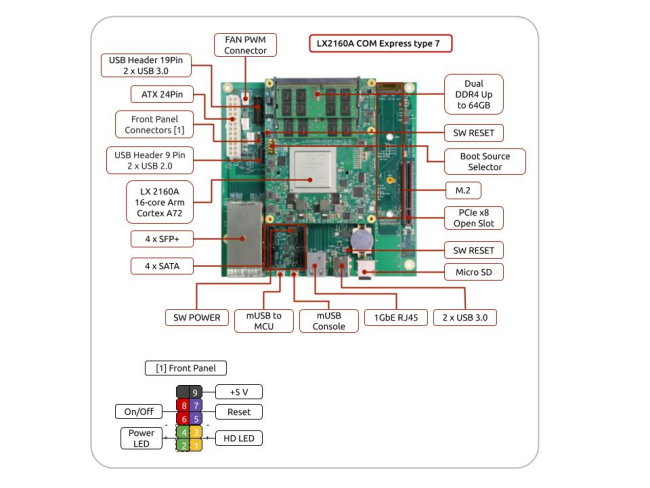
Honeycomb LX2K Main Board Specifications
| Processor | NXP Layerscape LX2160A 16-core Arm Cortex A72 up to 2GHz |
|---|---|
| Memory | Up to 64GB dual 64 bit SO-DIMM DDR4 |
| Storage | 64GB eMMC on board, MicroSD, SATA 3.0 x 4 |
| Expansion card I/Os | 1 PCIe x8 Gen 3.0, open slot (can support x16) and M.2 interface |
| Networking | 4 x SFP+ ports (10GbE each) 1 x 1GbE copper (RJ45) |
| Peripherals | USB 3.0 x 3, USB 2.0 x 3, USB to STM32 for remote management |
| Cooling | Heatsink and Fan included |
| Temperature | Commercial: 0°C to 70°C |
| Dimensions | PCBA: 170 x 170mm |
More specifics can be found here.
Board Layout
Hardware Recommendations
The list below is the hardware components the author of this document recommends. The case, power supply, Micro USB to Serial adapter, SSD Storage, Network components, and GPU, are a general, non-specific hardware configuration used during development. It is not a mandatory configuration. However, this list of hardware has been in use to develop Slackware ARM for about a year.
| Tested Hardware during Development | Notes | |
|---|---|---|
| Memory | 2x Kingston HyperX 16GB SO-DIMM DDR4 (up to 2x 32GB) - Board supports ECC too. | Specifically tested by SolidRun |
| NVME | Not currently in use | Could be used as the Root Drive. |
| Root Drive | Kingston 120GB A400 SATA 2.5“ SSD (SA400S37) | Could be added to the data RAID array |
| Data Storage | 3x Kingston 500GB A400 SATA 2.5” SSD (SA400S37) | RAID data array |
| SD Card | Gigastone 32GB Micro SD Card (UHS-I U1 A1 Class 10) | Great performance and mostly reliable |
| USB Memory | SanDisk 16GB Cruzer USB 2.0 Flash Drive or similar | Stores installer image on first installation |
| GPU (PCIe port) | AMD RX550 2GB GPU | works out of the box with Slackware ARM and has 1 DVI and 1 HDMI port. NVidia GPUs are not recommended. No driver for aarch64 |
| Monitor | Modern LCD or LED | Any monitor that uses HDMI or DVI inputs |
| Network | Asix USB 3.0 to Ethernet adapter | It was reported some time ago that the On-board ethernet port does not work until kernel firmware is installed. |
| Network | Cat6 Ethernet cable | 6 Feet in length recommended for the on board Realtek Ethernet port |
| SFP+ / Fiber | HiFiber 10Gb SFP+ RJ45 Module, 10Gbase-T Ethernet SFP+ Copper Transceiver (10G/5G/2.5G/1.25G) | Fiber connection untested without the RJ45 Module listed |
| Case | Rosewill FBM-X2 Micro ATX Mini Tower Computer Case | There is most definitely a better case. The USB ports on it are unreliable. |
| Power Supply | EVGA 100-BR-0450-K1 80+ Bronze 450W | May be a bit over kill. Reliable throughput. |
| Serial | Generic Micro USB to USB male cable for serial connection | Recommendations welcome for this guide |
| Cooling | A generic fan on the heatsink, above the CPU | Alternatives welcome. See Known Issue and Limitations at the end of this document |
The HoneyComb can be purchased directly from Solid-Run, online at https://shop.solid-run.com . Shipping takes several weeks as it comes from abroad and goes through customs. It is recommended that the board, memory and SD card be purchased as a bundle. Solid-Run certifies that the Kingston HyperX 32Gb RAM module has been thoroughly tested.
Preliminary Tasks
Boot Source Select Configuration
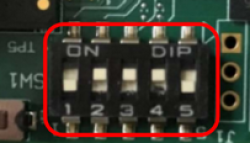
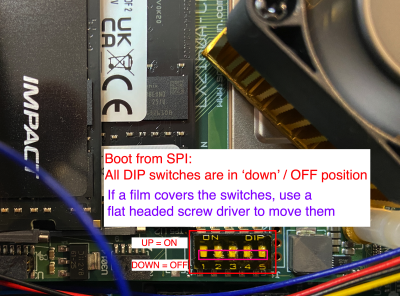
Also referred to as the DIP switch. It is found between the processor and the ATX input for the power supply. The image below describes in detail how the DIP switch can be configured. However, it is expected that the Slackware user to initially boot the installer with the SD image provided. Later on the firmware can be written to SPI Flash to free up the SD Card port.
The boot media must be selected prior to turning on your Honeycomb for the first time. The following chart is a reference for the DIP switch configuration. Switch number 5 is disabled and unused.
| Boot media | Switch 1 | Switch 2 | Switch 3 | Switch 4 | Switch 5 |
|---|---|---|---|---|---|
| SD | OFF | ON | ON | ON | X |
| eMMC | OFF | ON | ON | OFF | X |
| SPI | OFF | OFF | OFF | OFF | X |
UEFI Firmware and SPI Flash Memory
The Honeycomb LX2K does not use U-Boot as its boot loader for Slackware ARM. It requires that the UEFI firmware from the vendor be booted from a SD Card. The SD Card is the default boot method for the Honeycomb LX2K. The very first installation of Slackware ARM will need to be booted from a USB image. During the installation process the installer will prompt the user to install the UEFI firmware to SPI Flash.
Once the firmware is written to SPI flash, installation is successful, you need to completely power down the Honeycomb. The DIP switch needs to be adjusted to designate the SPI flash as the default boot method. From here on out, you will no longer need the USB image to boot the installer. You will be able to write the installer to a SD Card and boot the SD Card using the firmware in SPI Flash. The UEFI firmware functions much like a BIOS or UEFI interface from the x86 and x86_64 architectures. It is menu driven with the keyboard and can do all the same functionality you would expect in a BIOS or UEFI interface.
The relevant and most recent UEFI firmware from Solid-Run is already included on the Slackware ARM installation media. During post installation you will also notice that the firmware is located in /usr/share/hwm-bw-lx2160acex7/bootloader-firmware within your new system. Found on all Slackware ARM mirrors too: Slackware ARM mirror - Slackware.uk/slackwarearm
An older or differently configured firmware can be found on the Solid-Run web site. These firmware images are not supported by Slackware ARM: Solid-Run - images.solid-run.com.
Prepare Boot Media
TODO: create table explaining different UEFI firmware image naming conventions. TODO: remember to modify this section to reflect the steps taken with the bootloader flashing tool.
In order to prepare the Boot Media you must download the UEFI firmware that matches your RAM clock speed and desired SERDES configuration. It is important that the firmware you download matches your hardware specifications.
The UEFI firmware images are found here.
On a second computer you can write the UEFI firmware to your SD Card. Be certain that /dev/sdX points to your SD Card and nowhere else.
xzcat lx2160acex7_2000_700_....img.xz | dd of=/dev/sdX bs=4k conv=fdatasync
The Slackware ARM All-In-One Installer is the preferred method to install Slackware ARM on your Honeycomb Workstation. The image can be found here.
Once again, on your second computer write the Installer image to your USB thumb drive. Be certain you have selected the correct media.
xzcat lx2160acex7....img.xz | dd status=progress bs=4M iflag=fullblock of=/dev/XXX
Installation
Boot Installation Media
To boot the system insert the SD Card into the Micro SD port located on the backside of the board. Plug in your USB thumb drive containing the Slackware ARM installer to any available USB port. Next connect the MicroUSB end of your serial cable to the board and plug the USB male connector ending into a second computer.
Access the Serial Console
Configure GNU Screen to display and accept input from the serial cable within a terminal. Check the output of the dmesg command to identify the serial line connected to your second computer. The Honeycomb may be at ttyUSB1 or ttyUSB2. Typically /dev/ttyUSB0 is sufficient.
On your second computer you will need to be part of the dialout group to access the serial line as a regular user. Add your user to the dialout group:
# usermod -a -G dialout <username>
Log out of your user account and log back in so that your user has the permissions of the dialout group. Now the serial line can be accessed without the need to be root.
Now you can connect to the Honeycomb system serial console as a normal user:
$ screen /dev/ttyUSB0 115200
Using the UEFI Firmware
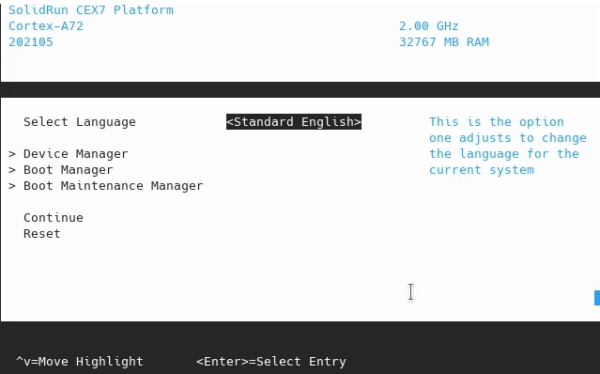
Turn on the Honeycomb and wait to be prompted to press the Escape key. This will open the UEFI firmware interface. It should be familiar if you have used a BIOS or UEFI interface on the x86 or x86_64 architectures.
A screen containing the UEFI menu will be displayed. Select the Boot Manager menu option.
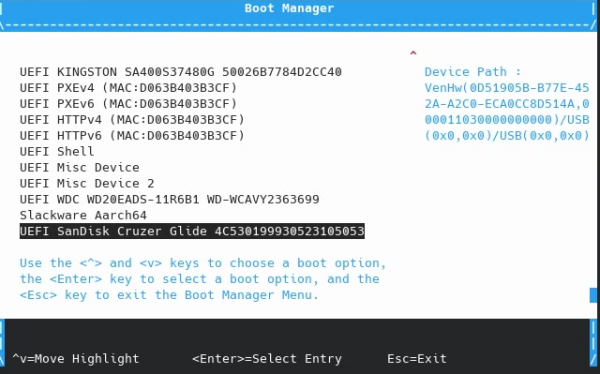
Select the USB thumb drive. In this case it is the UEFI SanDisk Cruzer Glide menu option. Press the Enter key.
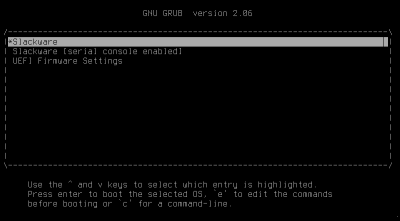
Grub Boot Loader
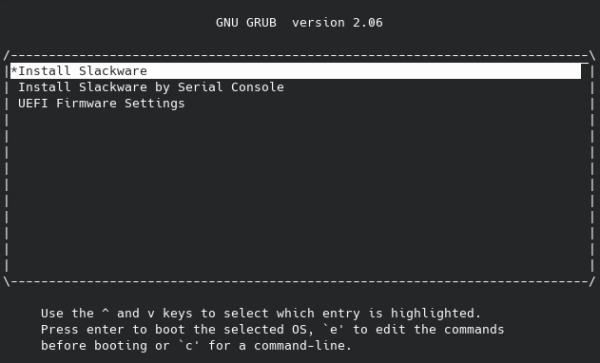
The next step is to make your selection in the GRUB menu. The boot options are as follows:
- HDMI or DVI with a monitor
- Serial console on a second computer display
- Return to the UEFI Firmware interface to adjust settings
If you have a GPU available it is possible it will not function without the correct Linux firmware. The Slackware ARM kernel-firmware package will have whatever corrections available in the Linux ecosystem. It is important to note that NVIDIA does not provide a driver for the Aarch64 architecture. As a result, you will be better off with an AMD branded PCIe GPU. See hardware recommendations above.
Disk Partitioning
An EFI partition is required for the UEFI firmware and GRUB boot loader to load Slackware ARM on the Honeycomb. It is required that the EFI partition be no less than 100 MB and recommended to be no greater than 300 MB. There are many partition layouts possible and many variations. In this guide it is assumed that one SATA 3.0 solid state drive (SSD) be partitioned with an EFI partition, a swap space, and the root partition. Finally, the partition table should be of type gpt.
Clear the disk label to assure the drive is empty:
gdisk /dev/sda
In the prompt, choose the “x” option and then the “z” option in gdisk. This will remove all disk labels.
Format the drive:
fdisk /dev/sda
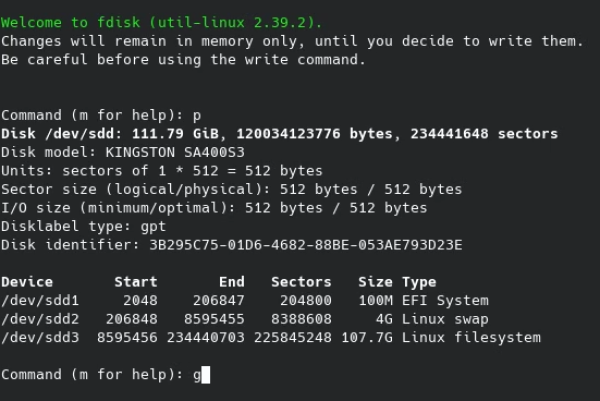
Use the “g” option first to use a GPT disk label. The UEFI firmware provided by the vendor has difficulty with a msdos disklabel. Stick with GPT.
TODO: add screenshot
Basic partition table:
Installation
TODO: more screen shots!
The preferred installation method is the Slackware ARM All-In-One Installer.
Date and Time
Before you begin the installation process make sure the time on your Honeycomb LX2K is correct.
Connect to the internet if an Ethernet connection is available.
# dhcpcd eth0
Synchronize with a time server to correct a possibly inaccurate system clock.
# ntpdate clock.akamai.com
# hwclock -w
Launch the Installer
Launch the installer with the setup command.
# setup
The installer will…
- Ask you to identify your swap space and activate it.
- Mention the system EFI partition that will be automatically identified and formatted.
- Ask you to assign your root partition and format it. Add any additional partitions you wish.
- Require you to choose “Yes” when you are asked to use the Slackware ARM tree included within the All-In-One installer.
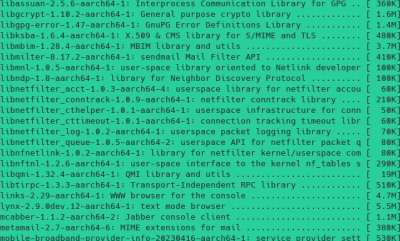
The next menu will ask you which Slackware package series you wish to install. A full installation is highly recommended. Below is an example of packages being installed.
Write Boot Loader Firmware to SPI Flash
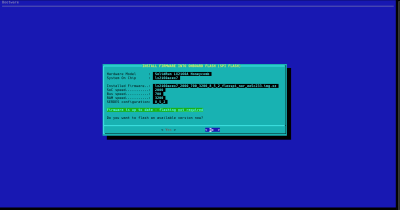
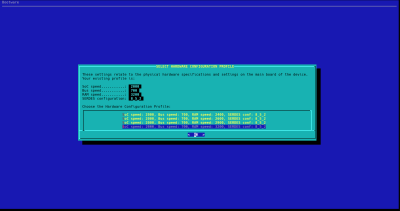
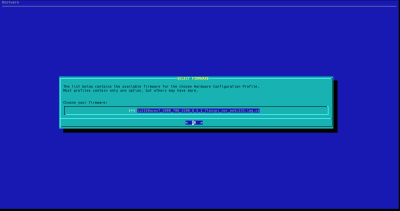
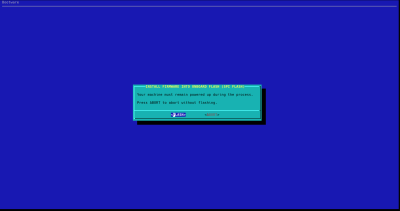
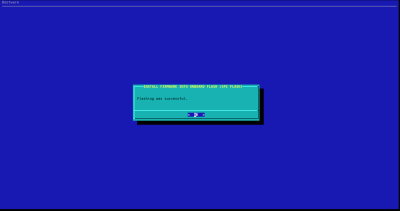
Following further into the installation process you will be asked to upgrade or install the UEFI firmware. It is a requirement of this guide that the firmware be installed into flash memory. If you choose to forego this option, you are in marginally unsupported territory. Below, the screen shots are fairly self explanatory.
1. Select “Yes” to start the flashing process.
2. Select the hardware configuration profile for your system.
3. Next you will select an option from a list of available firmware images
4. Confirm the selection to advance or Abort your selection to bail out of the flashing tool.
5. Following that, the firmware will be written to SPI flash. Do not cancel it, shut down your machine, or interrupt this process. The SPI flash chip will be erased first. After that the firmware will be written to memory.
6. Finally, you will be notified of the success or failure of this process.
Finishing Up the Installation
The remaining installation steps initiated by the setup command are left up to the reader to answer. You will be asked to pick the services you want to activate, amongst other custom options.
It is highly recommended to enable the Network Time Protocol service by editing /etc/ntp.conf and choosing a server. Many inconsistencies surface when a computer system has the wrong time.
server 0.pool.ntp.org iburst
#server 1.pool.ntp.org iburst
#server 2.pool.ntp.org iburst
#server 3.pool.ntp.org iburst
Power the Honeycomb LX2K completely down when you are finished. This is required due to a known issue mentioned in the previous section about flashing firmware.
# poweroff
Remember to reconfigure the DIP switch so that the SPI flash has priority prior to booting up the Honeycomb LX2K.
TODO: screen shot
Remove the USB thumb drive and power on the Honeycomb. When you are prompted to hit the Escape key, do so. Enter the Boot Maintenance Manager.
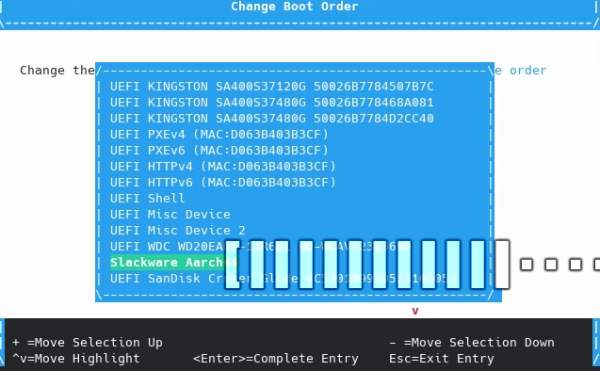
Change the Boot Order in the menu so that the root disk is at the top of the list. Make sure you save or commit your changes.
Exit to the main menu of the UEFI interface and select reset. This time do not interrupt the boot process by pressing the Escape key. You will be presented with a GRUB menu very similar to the menu offered by the Slackware ARM installer image.
Make your menu choice and boot into your fresh Slackware Aarch64 system.
Installation is now complete. Slack on!
Useful Guides and Resources
Known Issues and Feature Gaps
NVMe Suggestions
- Recommendations for supported NVMe M.2 storage are welcome.
More details on the development Road Map here.

