Questa è una vecchia versione del documento!
Indice
DA TRADURRE
Installazione di Slackware
L' installazione di Slackware e' un pochino piu' semplicistica di quella della maggior parte delle altre distribuzioni Linux e ricorda molto l' installazione di un sistema BSD. Se hai familiarita' con tali sistemi dovresti sentirti a tuo agio. Se non hai mai installato Slackware o utilizzato una distribuzione che fa uso di un installer non grafico, potresti sentirti un po' sopraffatto inizialmente. Niente panico! L' installazione e' molto facile una volta che l' hai capita, e funziona praticamente su tutte le piattaforme x86.
Le ultime versioni di Slackware Linux sono distribuite su DVD o CD, ma Slackware puo' essere installato in diversi altri modi. Ci concentreremo solamente sul metodo piu' comune - il boot da DVD - in questo libro. Se non hai un lettore CD o DVD, potresti dare un' occhiata ai vari README files dentro la directory 'usb-and-pxe-installers' sul tuo mirror Slackware preferito. Questa directory include i files e le istruzioni necessarie per fare il boot dell' installer di Slackware da una chiavetta USB o da una scheda di rete che supporti il PXE. Questi files sono la miglior fonte di informazioni disponibile per il boot con tale metodo.
Un HOWTO su come impostare un boot server PXE proprio da un media di installazione (DVD o penna USB) e' disponibile in questo articolo separato: Out of the box Slackware PXE Server
Bootare l' installer
Bootare l' installer e' semplicemente il processo di inserire il disco di installazione di Slackware nel tuo drive CD o DVD e riavviare. Potresti dover entrare nel BIOS del tuo computer e modificare l' ordine di boot per dare una priorita' piu' alta al lettore ottico rispetto a quella degli hard drive. Alcuni computer permettono di cambiare al volo l' ordine di boot premendo uno specifico tasto funzione durante la prima fase di boot del sistema. Poiche' ogni computer e' differente non possiamo offrire istruzioni piu' dettagliate su come fare tutto cio', ma il metodo e' comunque semplice su pressoche' tutte le macchine.
Una volta che il tuo computer ha fatto il boot dal CD sarai condotto ad una schermata che ti permettera' di inserire alcuni parametri speciali per il kernel. Questo serve principalmente per permetterti di utilizzare l' installer come una sorta di disco di recupero. Alcuni sistemi potrebbero necessitare di particolari parametri del kernel per riuscire a fare il boot, ma si tratta di eccezioni piuttosto rare alla norma. La maggior parte degli utenti puo' semplicemente premere invio per far bootare il kernel.
Welcome to Slackware version 13.37 (Linux kernel 2.6.37.6)!

If you need to pass extra parameters to the kernel, enter them at the prompt
below after the name of the kernel to boot (huge.s etc).

In a pinch, you can boot your system from here with a command like:

boot: huge.s root=/dev/sda1 rdinit= ro

In the example above, /dev/sda1 is the / Linux partition.

This prompt is just for entering extra parameters.  If you don't need to enter
any parameters, hit ENTER to boot the default kernel "huge.s" or press [F2]
for a listing of more kernel choices.
Dovresti vedere un sacco di testo scorrere sullo schermo. Non allarmarti, e' perfettamente normale. Il testo che vedi e' generato dal kernel durante il boot-up mentre rileva il tuo hardware e prepara il caricamento del sistema operativo (in questo caso l' installer). Puoi leggere questi messaggi piu' tardi con il comando dmesg(1) se sei interessato. Spesso questi messaggi sono molto importanti per risolvere qualsiasi problema hardware che dovessi avere. Una volta che il kernel ha completato la rilevazione dell' hardware, questi messaggi dovrebbero terminare e dovresti vedere un' opzione per il caricamento del supporto per i layout di tastiera non us.
<OPTION TO LOAD SUPPORT FOR NON-US KEYBOARD>

If you are not using a US keyboard, you may need to load a different
keyboard map.  To select a different keyboard map, please enter 1
now.  To continue using the US map, just hit enter.

Enter 1 to select a keyboard map: _
Digitare 1 e premere ENTER ti fara' accedere alla lista delle mappature della tastiera. Scegli semplicemente quella che corrisponde al layout della tua tastiera e continua.
Welcome to the Slackware Linux installation disk! (version 13.37)

######  IMPORTANT!  READ THE INFORMATION BELOW CAREFULLY.  ######

- You will need one or more partitions of type 'Linux' prepared.  It is also
  recommended that you create a swap partition (type 'Linux swap') prior
  to installation.  For more information, run 'setup' and read the help file.

- If you're having problems that you think might be related to low memory, you
  can try activating a swap partition before you run setup.  After making a
  swap partition (type 82) with cfdisk or fdisk, activate it like this:
    mkswap /dev/<partition> ; swapon /dev/<partition>

- Once you have prepared the disk partitions for Linux, type 'setup' to begin
  the installation process.

- If you do not have a color monitor, type:  TERM=vt100
  before you start 'setup'.

You may now login as 'root'.

slackware login: **root**
A differenza di altre distribuzioni Linux che fanno il boot direttamente in un programma di installazione dedicato, l' installer di Slackware ti conduce ad una distribuzione Linux limitata, caricata nella RAM del tuo sistema. Questa distribuzione limitata verra' poi utilizzata per lanciare tutti i programmi di installazione manualmente, o puo' essere utilizzata in emergenza per riparar un sistema danneggiato che non riesce a fare il boot. Ora che sei loggato come root (non c'e' password all' interno dell' installer) e' il momento di cominciare a impostare i tuoi dischi. A questo punto, puoi impostare il supporto software per i RAID o gli LVM se lo desideri o persino crittare la partizione di root, ma questi argomenti esulano dagli ambiti di questo libro. Ti incoraggiamo a fare riferimento agli eccellenti files README_RAID.TXT, README_LVM.TXT, e README_CRYPT.TXT presenti nel tuo CD se desideri impostare il tuo sistema con questi tool avanzati. La maggior parte degli utenti non avra' nessuna necessita' di farlo e dovrebbe procedere direttamente al partizionamento.
Partizionamento
Il media di installazione di Slackware include dei tools per partizionare il disco fisso.
Di solito il partizionamento del disco e' un processo che si compone dei seguenti passi:
- Lanciare il programma di partizionamento desiderato sull' hard disk oggetto.
- Mostrare la tabella delle partizioni corrente per vedere se c'e' qualche partizione gia' installata.
- Se necessario, cancellare quelle partizioni.
- Creare una nuova partizione.
- Selezionare il tipo e la dimensione della nuova partizione.
- Continuare a creare le partizioni pianificate.
- Cambiare il tipo di partizione (Swap, Linux, Solaris, etc).
- Impostare come avviabile una determinata partizione.
- Scrivere la tabella delle partizioni su disco.
fdisk
Per utilizzare fdisk per partizionare un hard drive procedere con i seguenti passi. La tabella delle partizioni risultante puo' essere differente, questo e' solo un esempio:
Creare una nuova partizione, che sara' usata come swap:
root~# fdisk <path to drive> | (for example /dev/sda) <Return>
Command (m for help): p <Return>

Disk /dev/sda: 64 heads, 63 sectors, 621 cylinders
Units = cylinders of 4032 * 512 bytes

Command (m for help): n <Return>
Command action
   e   extended
   p   primary partition (1-4)
p <Return>

Partition number (1-4): 1 <Return>
First cylinder (1-621, default 1): 1 <Return>
Using default value 1
Last cylinder or +size or +sizeM or +sizeK (1-621, default 621): 100 <Return>
Cambiare ora il tipo della partizione creata in swap:
Command (m for help): t <Return>
Partition number (1-4): 1 <Return>
Hex code (type L to list codes): 82 <Return>
Changed system type of partition 1 to 82 (Linux swap)
La partizione seguente sara' utilizzato come partizione principale, e pertanto necessita di essere avviabile:
Command (m for help): n <Return>
Command action
   e   extended
   p   primary partition (1-4)
p <Return>
Partition number (1-4): 2 <Return>
First cylinder (101-621, default 101): <Return>
Using default value 101
Last cylinder or +size or +sizeM or +sizeK (101-621, default 621): <Return> | (the remainder of the disk will be used)
Per rendere avviabile la partizione:
Command (m for help): a <Return>
Partition number (1-4): 2 <Return>
Premere p ENTER nuovamente per vedere la nuova tabella delle partizioni:
Disk /dev/hdb: 64 heads, 63 sectors, 621 cylinders
Units = cylinders of 4032 * 512 bytes

   Device Boot    Start       End    Blocks   Id  System
/dev/hdb1            1        100    203797+  82  Linux swap
/dev/hdb2   *        101      621    1048107  83  Linux
Infine possiamo scrivere la tabella delle partizioni con w ENTER.
Quella presentata e' una tabella delle partizioni molto semplice, naturalmente fdisk supporta la creazione di un misto di partizioni fisiche e logiche.
cfdisk
cfdisk puo' raggiungere gli stessi risultati di fdisk ma mostrera' anche una semplice interfaccia utente che riporta la struttura corrente della tabella delle partizioni prima che sia salvata sull' hard disk. L' utente puo' ripetere gli stessi passi visti nella sezione dedicata a fdisk utilizzando le frecce cursore e il tabulatore per selezionare le voci del menu in basso allo schermo:
                                cfdisk 2.12r

                            Disk Drive: /dev/sda
                      Size: 5108373319 bytes, 5.1 GB
            Heads: 64   Sectors per Track: 63   Cylinders: 621

  Name        Flags      Part Type  FS Type          [Label]        Size (MB)

  sda1                    Primary   Linux swap                       822.61
  *sda2       Boot        Primary   Linux                           4285.76


  *[Bootable]* [ Delete ]  [  Help  ]  [Maximize]  [ Print  ]
   [  Quit  ]  [  Type  ]  [ Units  ]  [ Write  ]

               *Toggle bootable flag of the current partition*
Il Programma di Setup
Aiuto
Se non hai mai installato Slackware prima, puoi avere una panoramica di base dell' installer di Slackware leggendo il menu Help. La maggior parte delle informazioni qui e' su come navigare attraverso l' installer, cosa che dovrebbe abbastanza intuitiva, ma se non hai mai utilizzato un programma basato su curses potresti trovarlo utile.
Mappatura della Tastiera
Prima di procedere oltre, Slackware ti da la possibilita' di scegliere una mappatura diversa per la tua tastiera. Se stai utilizzando una tastiera US standard puoi tranquillamente saltare questo step, ma se stai utilizzando una tastiera internazionale potresti voler scegliere la corretta mappatura ora. Cio' assicura che i tasti che premerai sulla tua tastiera faranno esattamente quello che ti aspetti che dovrebbero fare.
Aggiunta Partizione di Swap
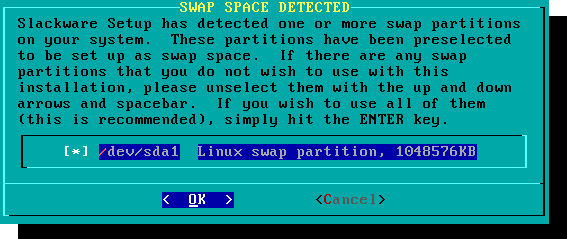
Se hai creato una partizione di swap, questo step ti permettera' di abilitarla prima di lanciare programmi che richiedano l' utilizzo intensivo di memoria, come ad esempio l' installazione dei pacchetti. Lo spazio di swap e' sostanzialmente una memoria virtuale. E' una partizione del disco fisso (o un file, sebbene l' installer di Slackware non supporti i file di swap) in cui regioni di memoria attiva vengono copiate quando il tuo computer e' a corto di RAM utilizzabile. Cio' permette al tuo computer si “swappare” programmi dentro e fuori dalla RAM attiva, permettendoti di usare piu' memoria di quanta il tuo computer ne abbia in realta'. Questo step aggiungera' anche la tua partizione di swap al file /etc/fstab cosicche' essa sara' disponibile al tuo sistema operativo.
Target
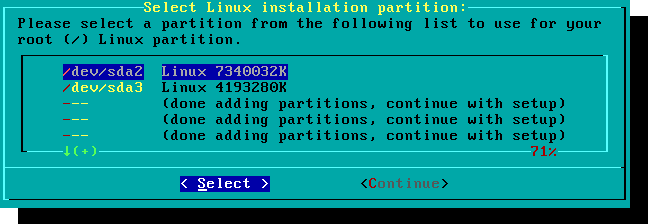
Il nostro prossimo passaggio consiste nel selezionare la nostra partizione di root e qualsiasi altra che vorremmo che Slackware utilizzasse. Ti viene data una scelta relativamente al filesystem da utilizzare e se formattare o meno la partizione. Se stai installando su una partizione nuova dovrai formattarla. Se hai una partizione con dei dati che vorresti salvare non formattare. Per esempio, molti utenti hanno una partizione /home separata, utilizzata per i dati dell' utente e impostata per non essere formattata durante l' installazione. Questo permette loro di installare versioni nuove di Slackware senza dover backuppare e restorare questi dati.
Sorgente
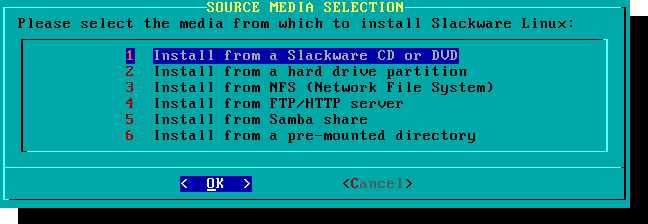
Qui puoi dire all' installer dove trovare i pacchetti di Slackware. Il metodo piu' comune e' di utilizzare i CD o il DVD di installazione, ma ci sono varie altre opzioni disponibili. Se hai i tuoi pacchetti installati su una partizione che hai impostato al passo precedente, puoi installare da quella partizione o da una directory montata in precedenza. (Potresti dover montare tale partizione con mount(8) prima. Vedi il capitolo 11 per maggiori dettagli). In piu', Slackware offre una varieta' di opzioni da rete, come share NFS, FTP. HTTP e Samba. Se selezioni un' installazione da rete, Slackware ti chiedera' alcune informazioni per il TCP/IP prima. Parleremo solo dell' installazione da DVD, ma gli altri metodi sono simili e altrettanto semplici.
Selezione
Install
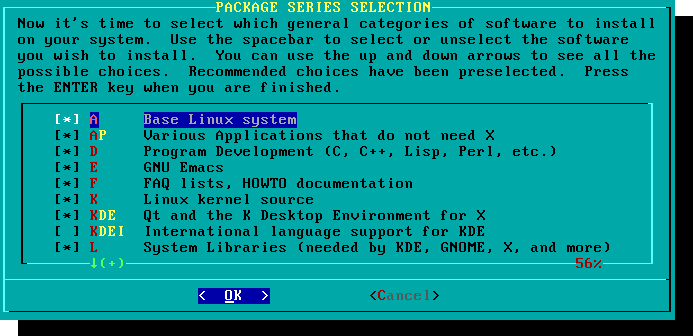
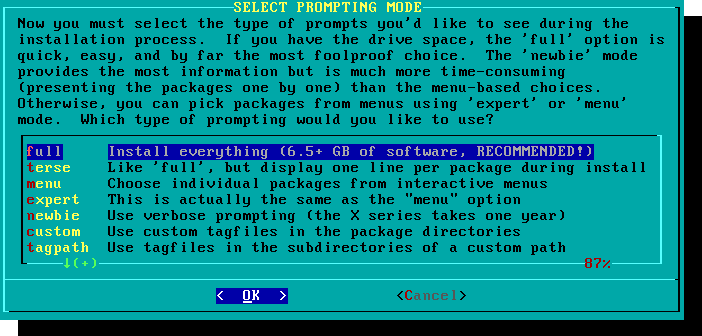
Finally we get to the meat of the installer. At this stage, Slackware will ask you what method to use to choose packages. If this is your first time installing Slackware, the “full” method is highly recommended. Even if this isn't your first time, you'll probably want to use it anyway.
The “menu” and “expert” options allow you to choose individual packages to install and are of use to skilled users familiar with the OS. These methods allow such users to quickly prune packages from the installer to build a very minimal system. If you don't know what you're doing (sometimes even if you do) you're likely to leave out crucial pieces of software and end up with a broken system.
The “newbie” method can be very helpful to a new user, but takes a very long time to install. This method will install all the required packages, then prompt you individually for every other package. The big advantage here is that is pauses and gives you a brief overview of the package contents. For a new user, this introduction into what is included with Slackware can be informative. For most other users it is a long and tedious process.
The “custom” and “tagpath” options should only be used by people with the greatest skill and expertise with Slackware. These methods allow the user to install packages from custom tagfiles. Tagfiles are only rarely used. We won't discuss them in this book.
Configure
Once all the packages are installed you're nearly finished. At this stage, Slackware will prompt you with a variety of configuration tasks for your new operating system. Many of these are optional, but most users will need to set something up here. Depending on the packages you've installed, you may be offered different configuration options than the ones shown here, but we've included all the really important ones.
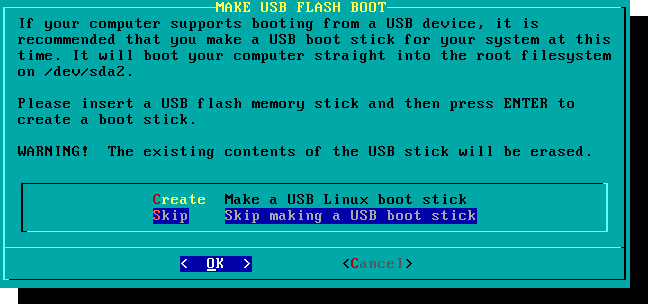
The first thing you'll likely be prompted to do is setup a boot disk. In the past this was typically a 1.44MB floppy disk, but today's Linux kernel is far too larger to fit on a single floppy, so Slackware offers to create a bootable USB flash memory stick. Of course, your computer must support booting from USB in order to use a USB boot stick (most modern computers do). If you do not intend to use LILO or another traditional boot loader, you should consider making a USB boot stick. Please note that doing so will erase the contents of whatever memory stick you're using, so be careful.
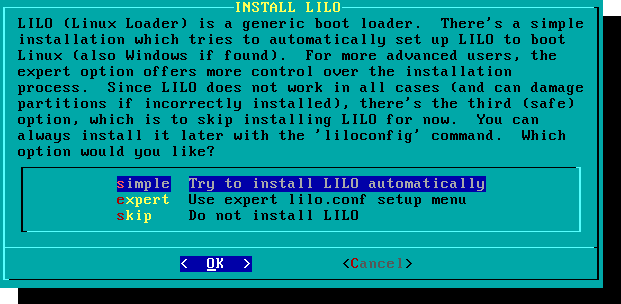
Nearly everyone will need to setup the LInux LOader, LILO. LILO is in charge of booting the Linux kernel and connecting to an initrd or the root filesystem. Without it (or some other boot loader), your new Slackware operating system will not boot. Slackware offers a few options here. The “simple” method attempts to automatically configure LILO for your computer, and works well with very simple systems. If Slackware is the only operating system on your computer, it should configure and install LILO for you without any hassle. If you don't trust the simpler method to work, or if you want to take an in-depth look at how to configure LILO, the “expert” method is really not all that complicated. This method will take you through each step and offer to setup dual-boot for Windows and other Linux operating systems. It also allows you to append kernel command parameters (most users will not need to specify any though).
LILO is a very important part of your Slackware system, so an entire section of the next chapter is devoted to it. If you're having difficulty configuring LILO at this stage, you may want to skip ahead and read Chapter 3 first, then return here.
This simple step allows you to configure and activate a console mouse for use outside of the graphical desktops. By activating a console mouse, you'll be able to easily copy and paste from within the Slackware terminal. Most users will need to choose one of the first three options, but many are offered, and yes those ancient two-button serial mice do work.
The next stage in configuring your install is the network configuration. If you don't wish to configure your network at this stage, you may decline, but otherwise you'll be prompted to provide a hostname for your computer. Do not enter a domain name, only the hostname.
The following screen will prompt you for a domainname, such as example.org. The combination of the hostname and the domainname can be used to navigate between computers in your network if you use an internal DNS service or maintain your /etc/hosts file.
You have three options when setting your IP address; you may assign it a static IP, or you may use DHCP, or you may configure a loopback connection. The simplest option, and probably the most common for laptops or computers on a basic network, is to let a DHCP server assign IP addresses dynamically. In practice, this often results in a consistent address since both dhcpcd and dhclient initially request the same address previously assigned. If the address is unavailable then the machine gets a new one, but on small networks this may never happen.
If the DHCP server on your network requires a specific DHCP hostname before you're permitted to connect. You can enter this on the Set DHCP Hostname screen.
To use a static IP address, you must provide:
Static IP Address
- IP Address: the address of your computer, such as
192.168.1.1(for IPv4). Also, you should verify that no DHCP server on your network is set to assign that same address out as a part of its DHCP pool, or you may encounter address conflicts. - Netmask: the subnet mask for your network; often
255.255.255.0for small networks. - Gateway Address: the address of the gateway server providing internet access to your network. On small networks, this will probably be provided by your ISP while on larger networks you may use an internal server which handles the traffic. In other words, this may be an internal address like
192.168.1.1or it might be an address provided by your ISP, such as75.146.49.79 - Nameserver: most likely, you'll want to utilize DNS; in this initial setup, provide your primary domain name server. Edit /etc/resolv.conf to add secondary and tertiary servers later.
The final screen during static IP address configuration is a confirmation screen, where you're permitted to accept your choices, edit them, or even restart the IP address configuration in case you decide to use DHCP instead.
Your network configuration is now complete. The next screen prompts you to configure the startup services that you wish to run automatically upon boot. Read the descriptions that appear both to the right of the service name as well as at the bottom of the screen in order to decide whether that service should be turned on by default. These can always be modified later with pkgtool > Setup > Services.
As the startup services window warns, you should only turn on the startup services that you actually intend to use. This not only decreases boot time but makes for a more secure system.
Every computer needs to keep track of the current time, and with so many timezones how does Slackware know which one to use? Well, you have to tell it which one to use, and that's why this step is here. If your computer's hardware clock is set to UTC (Coordinated Universal Time), you'll need to select that; most hardware clocks are not set to UTC from the factory (though you could set it that way on your own; Slackware doesn't care). Then simply select your timezone from the list provided and off you go.
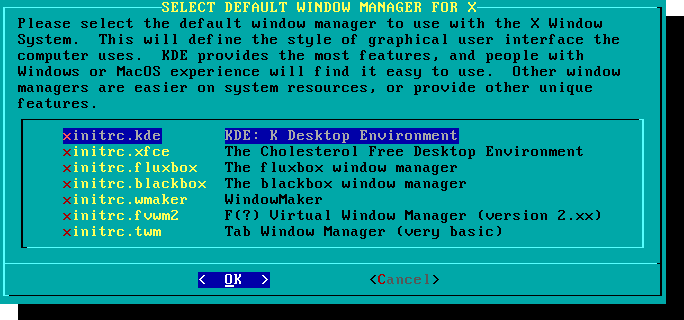
If you installed the X disk set, you'll be prompted to select a default window manager or desktop environment. What you select here will apply to every user on your computer, unless that user decides to run xwmconfig(1) and choose a different one. Don't be alarmed if the options you see below do not match the ones Slackware offers you. xwmconfig only offers choices that you installed. So for example, if you elected to skip the “KDE” disk set, KDE will not be offered.
The last configuration step is setting a root password. The root user is the “super user” on Slackware and all other UNIX-like operating systems. Think of root as the Administrator user. root knows all, sees all, and can do all, so setting a strong root password is just common sense.
With this last step complete, you can now exit the Slackware installer and reboot with a good old CTRL + ALT + DELETE. Remove the Slackware installation disk, and if you performed all the steps correctly, your computer will boot into your new Slackware linux system. If something went wrong, you probably skipped the LILO configuration step or made an error there somehow. Thankfully, the next chapter should help you sort that out.
Post Installation
When you have rebooted into your new Slackware installation, the very first step you should take is to create a user. By default, the only user that exists after the install is the root user, and it's dangerous to use your computer as root, given that there are no restrictions as to what that user can do.
The quickest and easiest way to create a normal user for yourself is to log in as root with the root password that you created at the end of the intallation process, and then issue the `adduser` command. This will interactively assist you in creating a user; see the section called Managing Users and Groups for more information.
Another important step is to make sure that your installation is up-to-date as new updates are being released that can include security fixes. To do that we can use the slackpkg tool to update the list of packages and install new updates with it.
One last thing - there will be mail in the root user's mailbox filled with useful information about package management, as well as system configuration and maintenance. You should check it with your favorite mail client. If you have not used any of the included mail clients, alpine is a good suggestion to get started quickly and easily.
Configuring Graphical Logins
Once your system is up to date and you have created your first user, you may want to configure your system to boot into X by default, with a graphical login instead of a console login. You can first test that X auto-detects your video correctly by issuing the `startx` command. If X11 starts and you end up at a desktop, you're probably good to go. Open the /etc/inittab file, as root, in your editor of choice. Change the following line:
# Default runlevel. (Do not set to 0 or 6)
id:3:initdefault:
To be this:
# Default runlevel. (Do not set to 0 or 6)
id:4:initdefault:
This sets your default run-level to 4, which is Slackware's “graphics-only” mode (with one extra tty open just in case, on vty 6). Save, and on your next reboot the system will boot into a nice graphical login.
You can manually enter run-level 4 by entering, as root, `init 4`.
To select or switch between available desktop environments run xwmconfig as root.
Adding multilib
If you just installed the 64-bit version of Slackware, you will soon discover that this is a “pure” 64-bit environment. In other words: out of the box, Slackware64 is not able to run or compile 32-bit program binaries.
Luckily, this is simple to fix. Adding the capability to run and/or compile 32-bit programs will turn your Slackware64 into a “multilib” system. Instructions can be found in the article “Adding Multilib Capability to Slackware on x86_64 Architecture” in our Wiki.
References
- Original source: http://slackbook.org/beta/#ch_install (authors: Alan Hicks, Chris Lumens, David Cantrell, Logan Johnson)
External links
Slackware 13.37: a distribution to (re)discover (in French)
This is a series of four detailed articles about Slackware, written by Kiki Novak for the french magazine Planète Linux (issues 67, 68, 69 and 70, November 2011 - May 2012).
Author's note: I do own the rights for these articles, so I've decided to link to them here. Feel free to cannibalize them as you wish, e. g. include parts of them - or the articles as a whole - in this wiki, change them as you feel inclined, quote them extensively, and translate bits of them or the whole series. To help you do this, I've included all the original files that were used in the making of these articles: original text in ODT format as well as all the screenshots in PNG format. Check out the links below the list.
-
- History of Slackware
- A few good reasons to choose Slackware
- A few good reasons not to choose Slackware
- It's not a bug, it's a feature!
- How to get Slackware
- Slackware-specific documentation
-
- Choose your boot parameters
- Select your keyboard layout
- Partition your hard disk
- Format your partitions
- Decide what you want to install
- Configure and install the bootloader
- Your mouse in console mode
- Networking and services
- Which font for the console?
- System clock and timezone
- Which graphical environment?
- A password for root
- Finish the installation and reboot
- What now?
-
- Create an initrd and use the generic kernel
- Fine-tune the LILO bootloader
- Configure the network
- Add one or more users
- Configure the sound
-
- Traditional Slackware package management
- Manage official Slackware packages using slackpkg
- Help! I can't find a package I need!
- Building a package using a SlackBuild script from SlackBuilds.org
- Manage SlackBuilds comfortably using sbopkg
- Configure the graphical server X.org
- Select your graphical environment
- Slackware in French
Original files (ODT manuscript, screenshots, etc.):
