
To jest stara wersja strony!
Spis treści
Instalacja Slackware
Instalacja Slackware jest bardzo uproszczona i podobna do instalacji jednej z odmian systemu operacyjnego BSD. Jeśli jesteś z tym zaznajomiony, możesz czuć się jak w domu. Jeśli nigdy wcześniej nie instalowałeś Slackware ani nie używałeś dystrybucji bez graficznego instalatora możesz czuć się na początku trochę przytłoczony. Nie panikuj! Instalacja jest bardzo prosta gdy ją zrozumiesz i działa na prawie każdej platformie x86.
Ostatnie wydania Slackware Linux są dystrybuowane na nośniach CD lub DVD, ale Slackware może być zainstalowany innymi sposobami. Skupimy się tylko na najbardziej typowej instalacji - uruchomieniu z DVD. Jeśli nie masz napędu CD lub DVD, może zechcesz popatrzeć na pliki README znajdujące się w katalogu usb-and-pxe-installers. Katalog ten zawiera niezbędne pliki i instrukcje aby uruchomić instalator Slackware z pamięci USB lub z użyciem karty sieciowej obsługującej PXE. Pliki tam zawarte są najlepszym źródłem informacji o tych dwóch metodach.
Poradnik jak uruchomic serwer PXE prosto z nośnika instalacyjnego Slackware (DVD lub pamięć USB) są dostępne w osobnym artykule: Out of the box Slackware PXE Server
Uruchomienie instalatora
Uruchomienia instalatora to prosty proces polegający na włożeniu nośnika instalacji Slackware do napędu CD lub DVD i ponownym uruchomieniu komputera. Możliwe że będziesz musiał udać się do BIOS'u komputera i zmienić kolejność uruchamiania tak aby napęd optyczny miał wyższy priorytet od dysków twardych. Niektóre komputery pozwalają zmienić kolejność uruchamiania poprzez naciśnięcie odpowiedniego klawisza podczas uruchamiania komputera. Ponieważ wszystkie komputery się różnią, nie możemy napisać instrukcji jak to zrobić, ale ta metoda jest łatwa do wykonania na wszystkich maszynach.
Kiedy już Twój komputer uruchomi się z płyty CD lub DVD zostaniesz przeniesiony do ekranu, który pozwoli Ci wpisać specyficzne opcje jądra. Znajduje się on w tym miejscu by pozwolic ci użyć instalacyjnego dysku jako pewnego rodzaju dysku ratunkowego. Niektóre systemy mogą wymagać podanie specjalnych opcji jądra aby możliwe było ich uruchomienie, jednak to bardzo rzadkie przypadki. Większość użytkowników może po prostu wcisnąć enter by pozwolić jądru uruchomić się.
Welcome to Slackware version 14.0 (Linux kernel 3.2.29)!

If you need to pass extra parameters to the kernel, enter them at the prompt
below after the name of the kernel to boot (huge.s etc).

In a pinch, you can boot your system from here with a command like:

boot: huge.s root=/dev/sda1 rdinit= ro

In the example above, /dev/sda1 is the / Linux partition.

This prompt is just for entering extra parameters.  If you don't need to enter
any parameters, hit ENTER to boot the default kernel "huge.s" or press [F2]
for a listing of more kernel choices.
Powinieneś zobaczyć dużo tekstu przelatującego na ekranie. Nie przejmuj się, to jest normalne. Tekst który widzisz jest generowany przez jądro podczas uruchomienia, wykrywania sprzętu i przygotowania do załadowania systemu operacyjnego (w tym wypadku instalatora). Jeśli jesteś zainteresowany możesz później przeczytać te informacje poprzez użycie polecenia dmesg(1). Informacje te są często bardzo ważne przy rozwiązywaniu problemów ze sprzętem. Kiedy jądro zakończy wykrywać sprzęt, wiadomości zatrzymają się, a Ty będziesz mógł wybrać obsługę układu klawiatury innego niż en-us.
<OPTION TO LOAD SUPPORT FOR NON-US KEYBOARD>

If you are not using a US keyboard, you may need to load a different
keyboard map.  To select a different keyboard map, please enter 1
now.  To continue using the US map, just hit enter.

Enter 1 to select a keyboard map: _
Wciśnięcie 1 a następnie ENTER przeniosą Cię do listy układów klawiatury. Po prostu wybierz układ odpowiadający Twojemu układowi klawiatury i kontynuuj.
Welcome to the Slackware Linux installation disk! (version 13.37)

######  IMPORTANT!  READ THE INFORMATION BELOW CAREFULLY.  ######

- You will need one or more partitions of type 'Linux' prepared.  It is also
  recommended that you create a swap partition (type 'Linux swap') prior
  to installation.  For more information, run 'setup' and read the help file.

- If you're having problems that you think might be related to low memory, you
  can try activating a swap partition before you run setup.  After making a
  swap partition (type 82) with cfdisk or fdisk, activate it like this:
    mkswap /dev/<partition> ; swapon /dev/<partition>

- Once you have prepared the disk partitions for Linux, type 'setup' to begin
  the installation process.

- If you do not have a color monitor, type:  TERM=vt100
  before you start 'setup'.

You may now login as 'root'.

slackware login: **root**
W odrożnieniu od innych dystrybucji Linuksa które od razu uruchomią program instalacyjny, Slackware przenosi cię do ograniczonego systemu linuksowego załadowanego do pamięci RAM komputera. Ta ograniczona dystrybucja jest następnie użyta do uruchomienia programów instalacyjnych ręcznie lub może być użyta ratunkowa by naprawić zepsuty system, który się nie uruchamia. Gdy zalogujesz się jako root (w instalatorze nie wymaga to podania hasła) nadchodzi pora by ustawić dyski. W tym momencie możesz skonfigurować obsługę LVM, ustawić programy RAID lub zaszyfrować partycję root, te opcje nie są jednak tematem tego przewodnika. Odsyłam więc do plików README_RAID.TXT, README_LVM.TXT, oraz README_CRYPT.TXT znajdujących się na instalacyjnym nośniku. Większość użytkowników nie potrzebuje tego robić, powinni oni przejść do partycjonowania.
Partycjowanie
Nośnik instalacyjny Slackware jest dostarczany z narzędziami do partycjonowania dysku twardego. Zazwyczaj partycjonowanie przebiega według tych kroków:
- Uruchomienie wybranego programu na docelowym HDD.
- Wyświetlenie obecnej tablicy partycji by zapoznać się z istniejącymi partycjami.
- Jeśli jest to wymagana usunięcie niektórych lub wszystkich partycji.
- Utworzenie nowej partycji.
- Wybranie typu i rozmiaru nowej partycji.
- Kontynuowanie by utworzyć partycję taką jak planowano.
- Zmienienie typu partycji (Swap, Linux, Solaris, itd.).
- Ustawienie flagi „BOOT” dla wybranej partycji
- Zapisanie tablicy partycji.
fdisk
Użycie programu fdisk w celu zrobienia partycji na dysku twardym może być zrobione poprzez wykonanie poniższych kroków. Tablica partycji może też być utworzona inaczej, to jest tylko przykład:
Utworzenie nowej partycji która zostanie użyta jako swap:
root~# fdisk <ściezka do dysku> | (np. /dev/sda) <Enter>
Command (m for help): p <Enter>

Disk /dev/sda: 64 heads, 63 sectors, 621 cylinders
Units = cylinders of 4032 * 512 bytes

Command (m for help): n <Enter>
Command action
   e   extended
   p   primary partition (1-4)
p <Enter>

Partition number (1-4): 1 <Enter>
First cylinder (1-621, default 1): 1 <Enter>
Using default value 1
Last cylinder or +size or +sizeM or +sizeK (1-621, default 621): 100 <Enter>
Teraz by zmienić typ tej partycji na swap:
Command (m for help): t <Enter>
Partition number (1-4): 1 <Enter>
Hex code (type L to list codes): 82 <Enter>
Changed system type of partition 1 to 82 (Linux swap)
Następna partycja zostanie użyta jako główna partycja, musi ona mieć ustawioną flagę „BOOT”
Command (m for help): n <Enter>
Command action
   e   extended
   p   primary partition (1-4)
p <Enter>
Partition number (1-4): 2 <Enter>
First cylinder (101-621, default 101): <Enter>
Using default value 101
Last cylinder or +size or +sizeM or +sizeK (101-621, default 621): <Enter> | (reszta dysku zostanie użyta)
Aby ustawić nowo utworzoną partycję jako bootowalną:
Command (m for help): a <Enter>
Partition number (1-4): 2 <Enter>
Naciśnij p <Enter> ponownie by zobaczyć nową tablicę partycji
Disk /dev/hdb: 64 heads, 63 sectors, 621 cylinders
Units = cylinders of 4032 * 512 bytes

   Device Boot    Start       End    Blocks   Id  System
/dev/hdb1            1        100    203797+  82  Linux swap
/dev/hdb2   *        101      621    1048107  83  Linux
W końcu możemy wszystko zapisać wpisując w <Enter>.
To bardzo prosta tablica partycji, fdisk oczywiście wspiera tworzenie logicznych pomieszanych z podstawowymi.
cfdisk
cfdisk może być użyty by osiągnąć to samo co fdisk, ale dodatkowo wyświetla prosty interfejs użytkownika, który wyświetla obecną tablicę partycji zanim zostanie ona zapisana na HDD. Użytkownik może wykonać te same kroki co przy fdisk'u, używając strzałek i klawisza TAB by wybrać odpowiednie pozycje menu znajdującego się na dole tego ekranu:
                                cfdisk 2.12r

                            Disk Drive: /dev/sda
                      Size: 5108373319 bytes, 5.1 GB
            Heads: 64   Sectors per Track: 63   Cylinders: 621

  Name        Flags      Part Type  FS Type          [Label]        Size (MB)

  sda1                    Primary   Linux swap                       822.61
  *sda2       Boot        Primary   Linux                           4285.76


  *[Bootable]* [ Delete ]  [  Help  ]  [Maximize]  [ Print  ]
   [  Quit  ]  [  Type  ]  [ Units  ]  [ Write  ]

               *Toggle bootable flag of the current partition*
Program instalacyjny
Help
Jeśli nigdy wcześniej nie instalowałeś Slackware, możesz otrzymać podstawowe informacje dotyczące instalatora Slackware wybierając „Help” z menu. Większość informacji dotyczy nawigowania po instalatorze, co powinno być dosyć intuicyjne, ale jeśli nigdy wcześniej nie używałeś programów bazujących na curses może Ci się to przydać.
Keymap
Zanim przejdziemy dalej, Slackware daje nam możliwość wybrania innego układu klawiatury. Jeśli używasz standardowej klawiatury US możesz spokojnie pominąc ten krok, ale jeśli używasz międzynardowej klawiatury powinieneś wybrać odpowiedni układ teraz. To zapewnia że klawisz wciśnięty na klawiaturze zrobi dokładnie to czego oczekujesz od niego.
Addswap
Jeśli utworzyłeś partycję swap, ten krok pozwoli Ci uruchomić ją przez rozpoczęciem działań wymagających dużo pamięci takich jak instalowanie pakietów. Partycja wymiany to pamięć wirtualna, partycja dysku twardego (lub plik, ale instalator Slackware nie wspiera plików swap) używana gdy komputer w komputerze skończy się wolna pamięć RAM. Pozwala to na użycie większej ilości pamięci niż jest faktycznie dostęþna. Ten krok doda również partycję swap do /etc/fstab, więc będzie ona dostępna dla Twojego systemu.

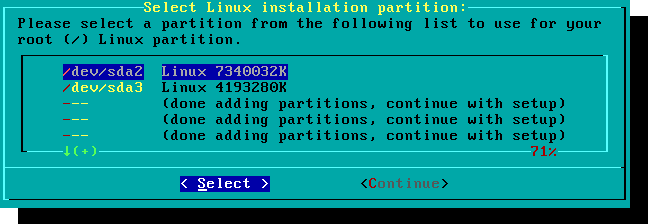
Target
Następnym krokiem jest wybranie partycji root i wszystkich innych partycji, które chcemy aby Slackware wykorzystał. Dostaniesz możliwość wyboru systemu plików, które zostanie użyty lub opcję bez formatowania partycji. Jeśli instalujesz na nową partycję, musisz ją sformatować. Jeśli masz partycję z danymi, które chcesz pozostawić, nie rób tego. Na przykład wielu użytkowników używa osobnej partycji /home, dla danych użytkowników i nie zaznacza jej do sformatowania podczas instalacji. Dzięki temu można zainstalować nowszą wersję Slackware bez kopiowania i przywracania tych danych.
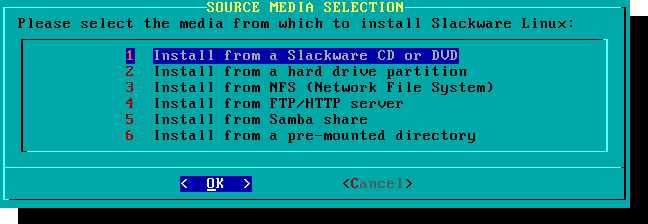
Source
Tutaj określasz gdzie instalator ma znaleźć pakiety Slackware. Najbardziej typowym scenariuszem jest użycie płyty instalacyjnej Slackware, ale inne opcje są także dostępna. Jeśli pakiety znajdują się na partycji, którą skonfigurowałeś w poprzednim kroku możesz zainstalować Slackware z zamontowanego katalogu (pre-mounted directory). (Być może najpierw będziesz musiał ją zamontować poleceniem mount(8). Zobacz rozdział 11 aby uzyskać więcej informacji.) Dodatkowo Slackware oferuje sposoby instalacji przez sieć takie jak zasoby NFS, FTP, HTTP i Samba. Jeśli wybierzesz instalacje przez sieć Slackware najpierw zapyta o konfiguracje TCP/IP. Opiszemy tylko metodę instalacji z DVD, ale inne sposoby są podobne i przystępne.
Select
Jedną z unikatowych cech Slackware jest jego sposób podzielenia pakietów na dyski. Na początku dostęp sieciowy do serwerów FTP był możliwy tylko przez powolne modemy. Slackware był podzielony na zestawy dysków, które mieściły się na dyskietkach, więc użytkownicy mogli pobrać i zainstalować tylko te pakiety które ich interesowały. Dziś ta praktyka jest kontynuowana, instalator pozwala ci wybrać które grupy pakietów zainstalować. To pozwala ci łatwo pominąć pakiety których nie chcesz, takie jak X i KDE na serwerach lub Emacsa gdziekolwiek. Weź pod uwagę że grupa pakietów „A” jest zawsze wymagana.

Install
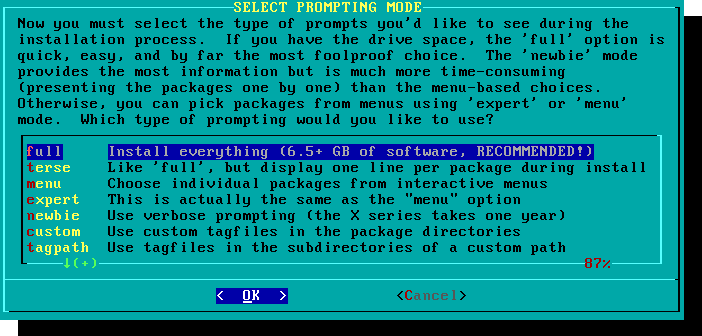
Finally we get to the meat of the installer. At this stage, Slackware will ask you what method to use to choose packages. If this is your first time installing Slackware, the „full” method is highly recommended. Even if this isn't your first time, you'll probably want to use it anyway.
The „menu” and „expert” options allow you to choose individual packages to install and are of use to skilled users familiar with the OS. These methods allow such users to quickly prune packages from the installer to build a very minimal system. If you don't know what you're doing (sometimes even if you do) you're likely to leave out crucial pieces of software and end up with a broken system.
The „newbie” method can be very helpful to a new user, but takes a very long time to install. This method will install all the required packages, then prompt you individually for every other package. The big advantage here is that is pauses and gives you a brief overview of the package contents. For a new user, this introduction into what is included with Slackware can be informative. For most other users it is a long and tedious process.
The „custom” and „tagpath” options should only be used by people with the greatest skill and expertise with Slackware. These methods allow the user to install packages from custom tagfiles. Tagfiles are only rarely used. We won't discuss them in this book.
Configure
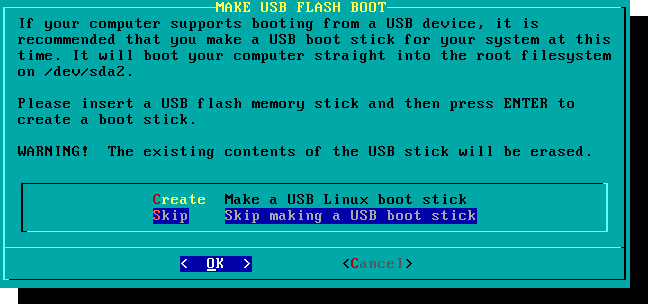
Once all the packages are installed you're nearly finished. At this stage, Slackware will prompt you with a variety of configuration tasks for your new operating system. Many of these are optional, but most users will need to set something up here. Depending on the packages you've installed, you may be offered different configuration options than the ones shown here, but we've included all the really important ones.
The first thing you'll likely be prompted to do is setup a boot disk. In the past this was typically a 1.44MB floppy disk, but today's Linux kernel is far too larger to fit on a single floppy, so Slackware offers to create a bootable USB flash memory stick. Of course, your computer must support booting from USB in order to use a USB boot stick (most modern computers do). If you do not intend to use LILO or another traditional boot loader, you should consider making a USB boot stick. Please note that doing so will erase the contents of whatever memory stick you're using, so be careful.
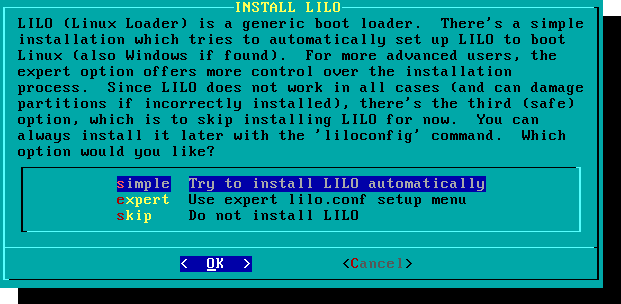
Nearly everyone will need to setup the LInux LOader, LILO. LILO is in charge of booting the Linux kernel and connecting to an initrd or the root filesystem. Without it (or some other boot loader), your new Slackware operating system will not boot. Slackware offers a few options here. The „simple” method attempts to automatically configure LILO for your computer, and works well with very simple systems. If Slackware is the only operating system on your computer, it should configure and install LILO for you without any hassle. If you don't trust the simpler method to work, or if you want to take an in-depth look at how to configure LILO, the „expert” method is really not all that complicated. This method will take you through each step and offer to setup dual-boot for Windows and other Linux operating systems. It also allows you to append kernel command parameters (most users will not need to specify any though).
LILO is a very important part of your Slackware system, so an entire section of the next chapter is devoted to it. If you're having difficulty configuring LILO at this stage, you may want to skip ahead and read Chapter 3 first, then return here.
This simple step allows you to configure and activate a console mouse for use outside of the graphical desktops. By activating a console mouse, you'll be able to easily copy and paste from within the Slackware terminal. Most users will need to choose one of the first three options, but many are offered, and yes those ancient two-button serial mice do work.
The next stage in configuring your install is the network configuration. If you don't wish to configure your network at this stage, you may decline, but otherwise you'll be prompted to provide a hostname for your computer. Do not enter a domain name, only the hostname.
The following screen will prompt you for a domainname, such as example.org. The combination of the hostname and the domainname can be used to navigate between computers in your network if you use an internal DNS service or maintain your /etc/hosts file.
You have three options when setting your IP address; you may assign it a static IP, or you may use DHCP, or you may configure a loopback connection. The simplest option, and probably the most common for laptops or computers on a basic network, is to let a DHCP server assign IP addresses dynamically. In practice, this often results in a consistent address since both dhcpcd and dhclient initially request the same address previously assigned. If the address is unavailable then the machine gets a new one, but on small networks this may never happen.
If the DHCP server on your network requires a specific DHCP hostname before you're permitted to connect. You can enter this on the Set DHCP Hostname screen.
To use a static IP address, you must provide:
Static IP Address
- IP Address: the address of your computer, such as
192.168.1.1(for IPv4). Also, you should verify that no DHCP server on your network is set to assign that same address out as a part of its DHCP pool, or you may encounter address conflicts. - Netmask: the subnet mask for your network; often
255.255.255.0for small networks. - Gateway Address: the address of the gateway server providing internet access to your network. On small networks, this will probably be provided by your ISP while on larger networks you may use an internal server which handles the traffic. In other words, this may be an internal address like
192.168.1.1or it might be an address provided by your ISP, such as75.146.49.79 - Nameserver: most likely, you'll want to utilize DNS; in this initial setup, provide your primary domain name server. Edit /etc/resolv.conf to add secondary and tertiary servers later.
The final screen during static IP address configuration is a confirmation screen, where you're permitted to accept your choices, edit them, or even restart the IP address configuration in case you decide to use DHCP instead.
Your network configuration is now complete. The next screen prompts you to configure the startup services that you wish to run automatically upon boot. Read the descriptions that appear both to the right of the service name as well as at the bottom of the screen in order to decide whether that service should be turned on by default. These can always be modified later with pkgtool > Setup > Services.
As the startup services window warns, you should only turn on the startup services that you actually intend to use. This not only decreases boot time but makes for a more secure system.
Every computer needs to keep track of the current time, and with so many timezones how does Slackware know which one to use? Well, you have to tell it which one to use, and that's why this step is here. If your computer's hardware clock is set to UTC (Coordinated Universal Time), you'll need to select that; most hardware clocks are not set to UTC from the factory (though you could set it that way on your own; Slackware doesn't care). Then simply select your timezone from the list provided and off you go.
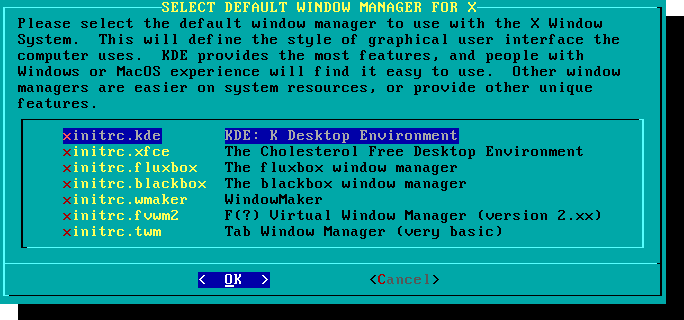
If you installed the X disk set, you'll be prompted to select a default window manager or desktop environment. What you select here will apply to every user on your computer, unless that user decides to run xwmconfig(1) and choose a different one. Don't be alarmed if the options you see below do not match the ones Slackware offers you. xwmconfig only offers choices that you installed. So for example, if you elected to skip the „KDE” disk set, KDE will not be offered.
The last configuration step is setting a root password. The root user is the „super user” on Slackware and all other UNIX-like operating systems. Think of root as the Administrator user. root knows all, sees all, and can do all, so setting a strong root password is just common sense.
With this last step complete, you can now exit the Slackware installer and reboot with a good old CTRL + ALT + DELETE. Remove the Slackware installation disk, and if you performed all the steps correctly, your computer will boot into your new Slackware linux system. If something went wrong, you probably skipped the LILO configuration step or made an error there somehow. Thankfully, the next chapter should help you sort that out.
Post Installation
When you have rebooted into your new Slackware installation, the very first step you should take is to create a user. By default, the only user that exists after the install is the root user, and it's dangerous to use your computer as root, given that there are no restrictions as to what that user can do.
The quickest and easiest way to create a normal user for yourself is to log in as root with the root password that you created at the end of the intallation process, and then issue the `adduser` command. This will interactively assist you in creating a user; see the section called Managing Users and Groups for more information.
Another important step is to make sure that your installation is up-to-date as new updates are being released that can include security fixes. To do that we can use the slackpkg tool to update the list of packages and install new updates with it.
One last thing - there will be mail in the root user's mailbox filled with useful information about package management, as well as system configuration and maintenance. You should check it with your favorite mail client. If you have not used any of the included mail clients, alpine is a good suggestion to get started quickly and easily.
Configuring Graphical Logins
Once your system is up to date and you have created your first user, you may want to configure your system to boot into X by default, with a graphical login instead of a console login. You can first test that X auto-detects your video correctly by issuing the `startx` command. If X11 starts and you end up at a desktop, you're probably good to go. Open the /etc/inittab file, as root, in your editor of choice. Change the following line:
# Default runlevel. (Do not set to 0 or 6)
id:3:initdefault:
To be this:
# Default runlevel. (Do not set to 0 or 6)
id:4:initdefault:
This sets your default run-level to 4, which is Slackware's „graphics-only” mode (with one extra tty open just in case, on vty 6). Save, and on your next reboot the system will boot into a nice graphical login.
You can manually enter run-level 4 by entering, as root, `init 4`.
To select or switch between available desktop environments run xwmconfig as root.
Adding multilib
If you just installed the 64-bit version of Slackware, you will soon discover that this is a „pure” 64-bit environment. In other words: out of the box, Slackware64 is not able to run or compile 32-bit program binaries.
Luckily, this is simple to fix. Adding the capability to run and/or compile 32-bit programs will turn your Slackware64 into a „multilib” system. Instructions can be found in the article „Adding Multilib Capability to Slackware on x86_64 Architecture” in our Wiki.
References
- Original source: http://slackbook.org/beta/#ch_install (authors: Alan Hicks, Chris Lumens, David Cantrell, Logan Johnson)
External links
Slackware 13.37: a distribution to (re)discover (in French)
This is a series of four detailed articles about Slackware, written by Kiki Novak for the french magazine Planète Linux (issues 67, 68, 69 and 70, November 2011 - May 2012).
Author's note: I do own the rights for these articles, so I've decided to link to them here. Feel free to cannibalize them as you wish, e. g. include parts of them - or the articles as a whole - in this wiki, change them as you feel inclined, quote them extensively, and translate bits of them or the whole series. To help you do this, I've included all the original files that were used in the making of these articles: original text in ODT format as well as all the screenshots in PNG format. Check out the links below the list.
-
- History of Slackware
- A few good reasons to choose Slackware
- A few good reasons not to choose Slackware
- It's not a bug, it's a feature!
- How to get Slackware
- Slackware-specific documentation
-
- Choose your boot parameters
- Select your keyboard layout
- Partition your hard disk
- Format your partitions
- Decide what you want to install
- Configure and install the bootloader
- Your mouse in console mode
- Networking and services
- Which font for the console?
- System clock and timezone
- Which graphical environment?
- A password for root
- Finish the installation and reboot
- What now?
-
- Create an initrd and use the generic kernel
- Fine-tune the LILO bootloader
- Configure the network
- Add one or more users
- Configure the sound
-
- Traditional Slackware package management
- Manage official Slackware packages using slackpkg
- Help! I can't find a package I need!
- Building a package using a SlackBuild script from SlackBuilds.org
- Manage SlackBuilds comfortably using sbopkg
- Configure the graphical server X.org
- Select your graphical environment
- Slackware in French
Original files (ODT manuscript, screenshots, etc.):
- Part 4, ZIP archive 1.5 MB system. Instructions can be found in the article