
¡Esta es una revisión vieja del documento!
Tabla de Contenidos
Configuración de su propio servidor de sincronización de Mozilla
Mozilla Sync es una función que es compatible con Firefox desde la versión 4. Le permite almacenar sus marcadores, el historial de navegación, las preferencias del navegador y las contraseñas guardadas en un servidor remoto. Incluso le permite trabajar en varias computadoras y tener la misma configuración de Firefox en todas estas computadoras. Esa es una característica muy buena. Por ejemplo, puede configurar la sincronización en el navegador Firefox de su teléfono Android y configurarlo rápidamente ingresando la clave de sincronización específica de su cuenta. Momentos después, tendrá la configuración de su navegador de escritorio sincronizado en su teléfono.
Mozilla ofrece servidores públicos de sincronización. Si no confía en sus contraseñas y en el historial de navegación en manos de Mozilla (aunque se supone que sus datos se cifran con su clave de sincronización única antes de que se carguen en Mozilla), puede usar este CÓMO para configurar su propio Servidor de sincronización. En casa (o en el trabajo).
Afortunadamente, Mozilla está abierto como siempre y hace que el código del Open Source Sync Server esté disponible para todos los que quieran jugar con él. Y no es difícil configurarlo.
Nota: Mozilla ha rediseñado y reescrito el Sync Server original (en ese momento se llamaba “ Mozilla Weave Server ” y era casi imposible de configurar). Ahora está escrito en Python, y los pasos para crear su propio Servidor de sincronización son descritos aquí. Esa página es lo que debes seguir. El resto de este CÓMO intenta aportar más detalles al proceso de configuración de su caja Slackware para convertirse en un verdadero servidor de sincronización.
¡Por supuesto que desea instalar esto en un servidor Slackware!
Requisitos
Hay algunas dependencias explícitas como se menciona en la Mozilla page:
- Python 2.6 (parte de Slackware 13.37. No he probado con Slackware 14 que se actualizó a Python 2.7)
- sqlite3 (ya suministrado por Slackware también)
- virtualenv. Los paquetes de Slackware se pueden descargar de: http://slackware.com/~alien/slackbuilds/virtualenv/o construir usando el SlackBuilds.org script .
El código del Servidor de sincronización está alojado en un repositorio de Mercurial y, dado que Slackware viene con un cliente de Mercurial, ese código es fácil de consultar en un directorio local donde continúa compilando el servidor binario:
$ mkdir -p /usr/local/server-full
$ cd /usr/local/server-full
$ hg clone https://hg.mozilla.org/services/server-full/ .
$ make build
Ahora, este servidor está listo para ejecutarse, pero a menos que realice algunos cambios de configuración, no va a hacer bien el servicio:
- De manera predeterminada, el servidor almacena sus datos de sincronización en una base de datos sqlite (si lo desea, puede usar una base de datos de servidor MySQL real), pero creará la base de datos sqlite en
/tmp, lo cual es totalmente inapropiado. Más abajo encontrará lo que tiene que modificar para que los datos de sincronización de sus clientes vayan a un lugar menos “volátil”. - El servidor de sincronización basado en python puede ejecutarse solo en un número de puerto configurable (5000 de forma predeterminada), lo cual está bien si usted es su único usuario en su pequeña LAN. Pero incluso Mozilla aconseja poner un servidor web real entre usted y el servidor de sincronización. En Slackware puedes usar el servidor web apache para esto. Debe instalar un módulo de apache adicional para que esto funcione: mod_wsgi. Los paquetes de Slackware más el script de SlackBuild se pueden descargar aquí: http://slackware.com/~alien/slackbuilds/mod_wsgi/] u obtenga un SlackBuild alternativo de [[http://slackbuilds.org/result/?search=mod_wsgi|slackbuilds.org.
Configuración
- Crea un usuario y grupo del sistema (
weave: sync) que ejecutará Sync Server para que no pueda interferir con Apache si algo se vuelve loco:# groupadd sync # useradd -g sync weave
If you omitted the creation of the home directory for this “
weave” user account, then create it like this:# mkdir /home/weave # chown weave:sync /home/weave # chmod 711 /home/weave
- Crea un nuevo archivo“
/etc/httpd/extra/httpd-wsgi.conf” con el siguiente contenido (adapte a su nombre de host del servidor de sincronización real):<Directory /usr/local/server-full> Order deny,allow Allow from all </Directory> <VirtualHost *:80> ServerName sync.myserver.net DocumentRoot /usr/local/server-full WSGIProcessGroup sync WSGIDaemonProcess sync user=weave group=sync processes=2 threads=25 WSGIPassAuthorization On WSGIScriptAlias / /usr/local/server-full/sync.wsgi CustomLog /var/log/httpd/sync.myserver.net-access.log combined ErrorLog /var/log/httpd/sync.myserver.net-error.log </VirtualHost>Apache 2.4 usa una sintaxis diferente para el control de acceso:
    <Directory /usr/local/server-full>
      Require all granted
    </Directory>

    <VirtualHost *:80>
      ServerName sync.myserver.net
      DocumentRoot /usr/local/server-full
      WSGIProcessGroup sync
      WSGIDaemonProcess sync user=weave group=sync processes=2 threads=25
      WSGIPassAuthorization On
      WSGIScriptAlias / /usr/local/server-full/sync.wsgi
      CustomLog /var/log/httpd/sync.myserver.net-access.log combined
      ErrorLog  /var/log/httpd/sync.myserver.net-error.log
    </VirtualHost>
Esto le dice a apache que un script llamado “sync.wsgi” se generará como usuario “weave: sync” cada vez que un cliente se conecte a http://sync.myserver.net/ .
- Modificar el archivo de configuración principal de su servidor apache“
/etc/httpd/httpd.conf”, para hacerlo cargar el módulo mod_wsgi y usar su archivo de configuración. Añade las siguientes líneas ahttpd.conf:# Activate the WSGI module (serving python binaries to the web): Include /etc/httpd/extra/mod_wsgi.conf # Act as a reverse proxy to the Mozilla Sync server: Include /etc/httpd/extra/httpd-wsgi.conf
- Verifique la configuración de Apache para ver si hay errores de sintaxis que haya introducido:
# apachectl configtest
- Reinicie Apache:
# /etc/rc.d/rc.httpd stop
# pause 3
# /etc/rc.d/rc.httpd stop
# /etc/rc.d/rc.httpd start
- Configurar los archivos de configuración del servidor de sincronización.
- Dentro del directorio“
/usr/local/server-full” (donde el código del Servidor de sincronización se ha descargado y creado si siguió este CÓMO al pie de la letra) encontrará el código mencionado anteriormente.“sync.wsgi” script. Abra el archivo en un editor. Lea el archivo y cámbielo por algo que le resulte más adecuado. Por ejemplo, cambiar “/tmp” to “/var/tmp” en la linea “os.environ['PYTHON_EGG_CACHE'] = ‘/tmp/python-eggs’”:os.environ['PYTHON_EGG_CACHE'] = '/tmp/python-eggs'
cambie a
os.environ['PYTHON_EGG_CACHE'] = '/var/tmp/python-eggs'
- Next, edit the file “
development.ini” (that filename is configured in “sync.wsgi” in case you want to use another name). In that file change the location of the error logfile so that it is created in “/var/tmp”. The lineargs = (‘/tmp/sync-error.log’,)
changes to:
args = ('/var/tmp/sync-error.log',) - The “
development.ini” file also mentions the name of the actual sync configuration file “etc/sync.conf”. Note that this path is relative to the Weave server’s root directory. It requires some editing! For instance, create the SQL database file in the “weave” user’s own home directory. The linesqluri = sqlite:////tmp/test.db
becomes:
sqluri = sqlite:////home/weave/my_weave_server.db
The default value for the quota assigned to each sync account is too low (it’s set to 5 MB). Mozilla states that 99.9% of all clients which connect to its public server use less than 25 MB of quota, so use that value as a default. The line
quota_size = 5120
changes to:
quota_size = 25600
Then, look for the following line and make absolutely certain that it is changed to the Apache http:// URL of your Sync Server, i.e. the URL that the sync clients are going to use:
fallback_node = http://localhost:5000/
You can play with other options in this file to see what they can offer. For instance, you can disable “captcha” and not enable SSL, but you may decide that this is important to your setup.
USing the Sync Server
And now it is time to tell your Firefox browser to use this new service!
- Select “Tools > Setup sync …”:
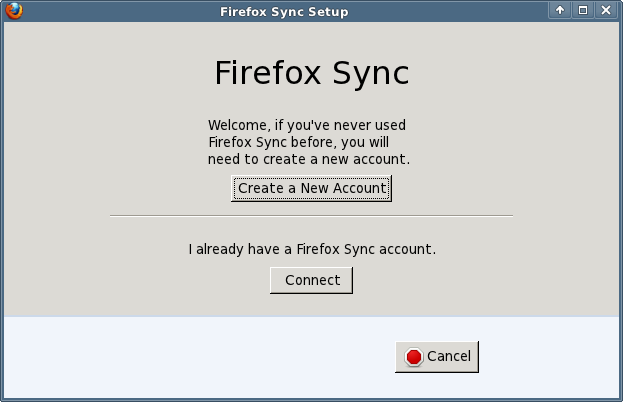

- In case this is the first time you talk to your Sync Server, you need to setup an account, so click the button “
Create a New Account“. This opens a new dialog box where you can type your email address (this will become your account name), an associated password and then in the dropdown menu, do not select “Firefox Sync Server”. Instead, you choose “Use a custom server”. This allows you to enter the URL for your brand-new private Sync Server.
Once the account has been created, Firefox will show you the sync key it will be using to encrypt your data. That key is important, you will need it if you want to add more computers to your sync account.
And that’s basically it – the sync process will start immediately: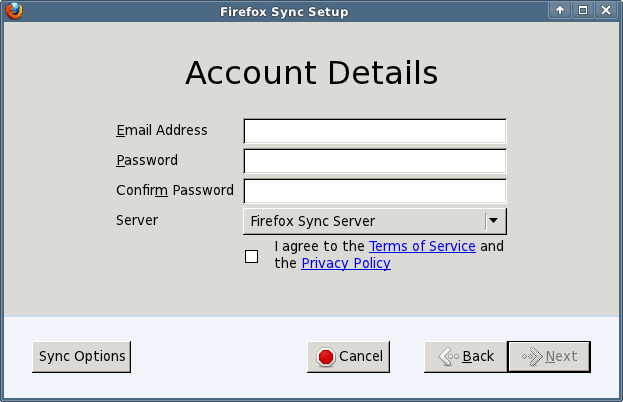

- Else if you already have a Sync Account and want to add a second computer to it, you can click on “
Connect” in the first dialog which will open a new dialog. There are two ways to add this computer to your existing sync account:- Either you enter the code which is being shown on another computer which is already syncing to the server;
- Or else you click on “
I don’t have the device with me“. This is what you would usually do. It is cumbersome to search for another computer or hand-held if all you need to know is your sync key: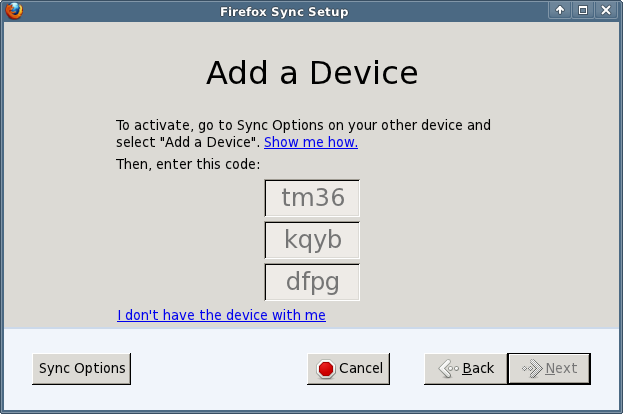

- If you know your sync key you can enter that in the following dialog, along with your account details and the server URL:
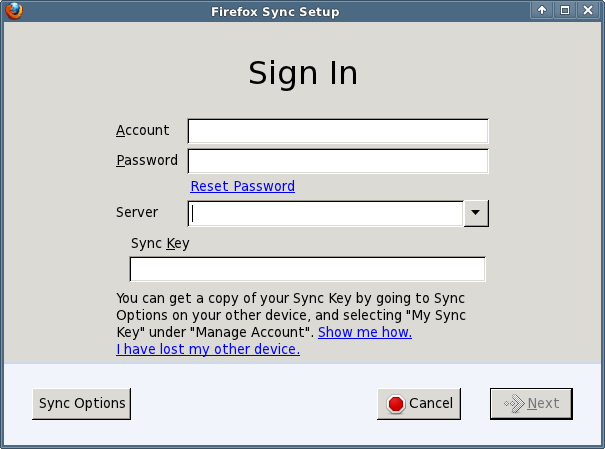

The sync key which is associated with your sync account can be retrieved at any moment should you have forgotten to write it down. Just go to a computer which has been setup for Sync, and open your Firefox browser’s Preferences at the “Sync” tab. Under “Manage your account” you will find a menu item to display your key (as well as a way to change your account’s password).
More help can be found at http://support.mozilla.com/kb/what-firefox-sync .
Securing your Sync Server with SSL
 - This section is coming soon! You really want your Sync server to be accessible over https:// if you sync over the Internet.
Sources
- Originally written by Eric Hameleers
- Original source: Alien Pastures Blog