
Ceci est une ancienne révision du document !
Table des matières
Configurer votre propre serveur de synchronisation Mozilla
Mozilla Sync est une fonctionnalité disponible dans Firefox depuis la version 4. Il vous permet de stocker vos marque pages , votre historique de navigation, les préférences de votre navigateur et les mots de passe que vous avez enregistrés sur un serveur distant. Il vous permet même de travailler sur plusieurs machines et avoir la même configuration de Firefox sur toutes ces machines. C’est une fonctionnalité vraiment pratique. Vous pouvez par exemple démarrer la synchronisation sur le navigateur Firefox de votre smartphone Android et la configurer rapidement en entrant simplement votre clé de synchronisation spécifique à votre compte. Quelques instants plus tard, le navigateur Firefox sur votre smartphone Android sera complétement synchronisé avec la configuration de Firefox à votre bureau.
Mozilla offre des serveurs public de synchronisation. Si vous ne faites pas confiance à Mozilla pour stocker vos mots de passe et votre historique de navigation ( bien que vos données soient supposées être encryptées par votre clé de synchronisation avant d'être placées sur les serveur de Mozilla) , vous pouvez utiliser cet HOWTO pour mettre en place votre propre serveur de synchronisation à la maison ( ou au bureau ).
Par chance, Mozilla est partisan de l'Open Source et rend le code de son serveur de synchronisation disponible pour tous ceux qui veulent jouer avec. Et le faire fonctionner n'est pas du tout difficile.
Note: Mozilla a reconçu et réécrit son serveur de Synchronisation originel ( appelé “Mozilla Weave Server” à ce moment qui était presque impossible à configurer ). Il est maintenant écrit en Python et les étapes pour créer votre propres serveur de synchronisation sont décrites sur cette page. Suivez les instructions de cette page. Le reste de ce HOWTO essaie de vous apporter plus de détails sur la façon de configurer votre machine Slackware en un réel serveur de synchronisation.
Car bien sur vous voulez installer ceci sur un serveur Slackware !
Dépendances
Il y a des dépendances explicites telles que mentionnées sur la page de Mozilla:
- python 2.6 ( fait partie de Slackware 13.37. Je n'ai pas testé sur Slackware 14 qui a pris python 2.7)
- sqlite3 (fait également partie de Slackware 13.37.)
- virtualenv. Les paquetages Slackware packages peuvent être téléchargés ici: http://slackware.com/~alien/slackbuilds/virtualenv/ ou peuvent être créés en utilisant ce script SlackBuild .
Installer le paquetage virtualenv n'est pas vraiment nécessaire puisqu'il sera automatiquement téléchargé durant la commande “make build” que vous allez utiliser à la prochaine étape de la procédure.
Le code du serveur de synchronisation (Sync Server) est hébergé sur un dépôt Mercurial et comme Slackware est livré avec un client Mercurial, ce code est facile à télécharger dans un répertoire local où vous continuerez à construire le binaire du serveur:
$ mkdir -p /usr/local/server-full
$ cd /usr/local/server-full
$ hg clone https://hg.mozilla.org/services/server-full/ .
$ make build
Maintenant, ce serveur est prêt à tourner, mais si vous ne faites pas quels changement dans sa configuration, il ne tournera pas bien :
- Par défaut, le serveur stocke vos données de synchronisation dans une base sqlite(vous pouvez utiliser une réelle base de données MySQL si vous voulez), mais il va créer cette base sqlite dans
/tmpce qui n'est pas du tout adapté.Un peu plus loin, vous trouverez qu'il faut modifier cet emplacement afin que les données de synchronisation de vos clients soient stockés dans un endroit moins “volatile”. - Le serveur de synchronisation en Python peut tourner en standalone sur un port (500 par défaut) qui sera parfait si vous êtes le seul utilisateur dans votre petit réseau local. Mais même Mozilla vous conseille de positionner un vrai serveur Web entre vous et le serveur de synchronisation. Avec Slackware vous pouvez utiliser le serveur Apache pour faire ça. Il faut installer un module apache supplémentaire pour que cela puisse marcher : mod_wsgi. Les paquetages Slackware peuvent être téléchargés ici :http://slackware.com/~alien/slackbuilds/mod_wsgi/ .
Configuration
- Create a separate system user and group (
weave:sync) which is going to run the Sync Server so that it can not interfere with Apache if anything goes crazy:# groupadd sync # useradd -g sync weave
If you omitted the creation of the home directory for this “
weave” user account, then create it like this:# mkdir /home/weave # chown weave:sync /home/weave # chmod 711 /home/weave
- Create a new file “
/etc/httpd/extra/httpd-wsgi.conf” with the following content (adapt to your actual sync server hostname):<Directory /usr/local/server-full> Order deny,allow Allow from all </Directory> <VirtualHost *:80> ServerName sync.myserver.net DocumentRoot /usr/local/server-full WSGIProcessGroup sync WSGIDaemonProcess sync user=weave group=sync processes=2 threads=25 WSGIPassAuthorization On WSGIScriptAlias / /usr/local/server-full/sync.wsgi CustomLog /var/log/httpd/sync.myserver.net-access.log combined ErrorLog /var/log/httpd/sync.myserver.net-error.log </VirtualHost>This tells apache that a script called “sync.wsgi” is going to be spawned as user “weave:sync” whenever a client connects to http://sync.myserver.net/ .
- Modify your apache server's main configuration file “
/etc/httpd/httpd.conf”, in order to make it load the mod_wsgi module and use its configuration file. Add the following lines to thehttpd.conf:# Activate the WSGI module (serving python binaries to the web): Include /etc/httpd/extra/mod_wsgi.conf # Act as a reverse proxy to the Mozilla Sync server: Include /etc/httpd/extra/httpd-wsgi.conf
- Check your Apache configuration for syntax errors which you may have introduced:
# apachectl configtest
- Restart Apache:
# /etc/rc.d/rc.httpd stop
# pause 3
# /etc/rc.d/rc.httpd stop
# /etc/rc.d/rc.httpd start
- Configure the Sync Server configuration files.
- Inside the directory “
/usr/local/server-full” (where the Sync Server code has been downloaded and built if you followed this HOWTO to the letter) you will find the aforementioned “sync.wsgi” script. Open the file in an editor. Read through the file and change it to something which you find better suited. For instance, change “/tmp” to “/var/tmp” in the line “os.environ['PYTHON_EGG_CACHE'] = ‘/tmp/python-eggs’”:os.environ['PYTHON_EGG_CACHE'] = '/tmp/python-eggs'
changes to
os.environ['PYTHON_EGG_CACHE'] = '/var/tmp/python-eggs'
- Next, edit the file “
development.ini” (that filename is configured in “sync.wsgi” in case you want to use another name). In that file change the location of the error logfile so that it is created in “/var/tmp”. The lineargs = (‘/tmp/sync-error.log’,)
changes to:
args = ('/var/tmp/sync-error.log',) - The “
development.ini” file also mentions the name of the actual sync configuration file “etc/sync.conf”. Note that this path is relative to the Weave server’s root directory. It requires some editing! For instance, create the SQL database file in the “weave” user’s own home directory. The linesqluri = sqlite:////tmp/test.db
becomes:
sqluri = sqlite:////home/weave/my_weave_server.db
The default value for the quota assigned to each sync account is too low (it’s set to 5 MB). Mozilla states that 99.9% of all clients which connect to its public server use less than 25 MB of quota, so use that value as a default. The line
quota_size = 5120
changes to:
quota_size = 25600
Then, look for the following line and make absolutely certain that it is changed to the Apache http:// URL of your Sync Server, i.e. the URL that the sync clients are going to use:
fallback_node = http://localhost:5000/
You can play with other options in this file to see what they can offer. For instance, you can disable “captcha” and not enable SSL, but you may decide that this is important to your setup.
USing the Sync Server
And now it is time to tell your Firefox browser to use this new service!
- Select “Tools > Setup sync …”:
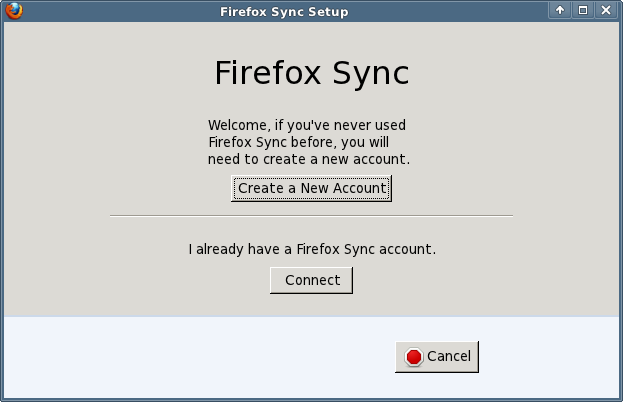

- In case this is the first time you talk to your Sync Server, you need to setup an account, so click the button “
Create a New Account“. This opens a new dialog box where you can type your email address (this will become your account name), an associated password and then in the dropdown menu, do not select “Firefox Sync Server”. Instead, you choose “Use a custom server”. This allows you to enter the URL for your brand-new private Sync Server.
Once the account has been created, Firefox will show you the sync key it will be using to encrypt your data. That key is important, you will need it if you want to add more computers to your sync account.
And that’s basically it – the sync process will start immediately: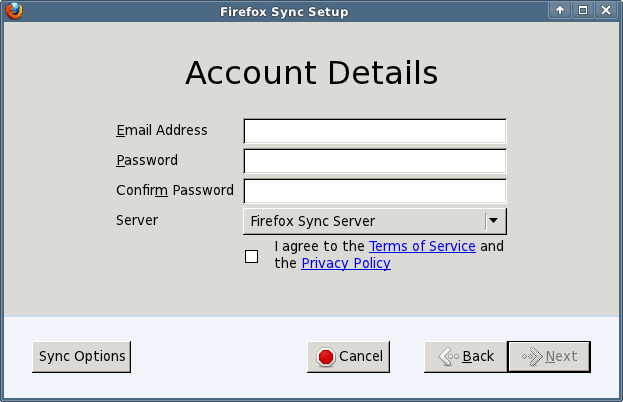

- Else if you already have a Sync Account and want to add a second computer to it, you can click on “
Connect” in the first dialog which will open a new dialog. There are two ways to add this computer to your existing sync account:- Either you enter the code which is being shown on another computer which is already syncing to the server;
- Or else you click on “
I don’t have the device with me“. This is what you would usually do. It is cumbersome to search for another computer or hand-held if all you need to know is your sync key: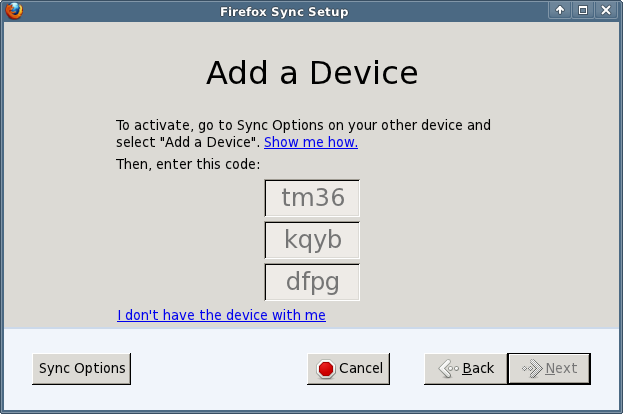

- If you know your sync key you can enter that in the following dialog, along with your account details and the server URL:
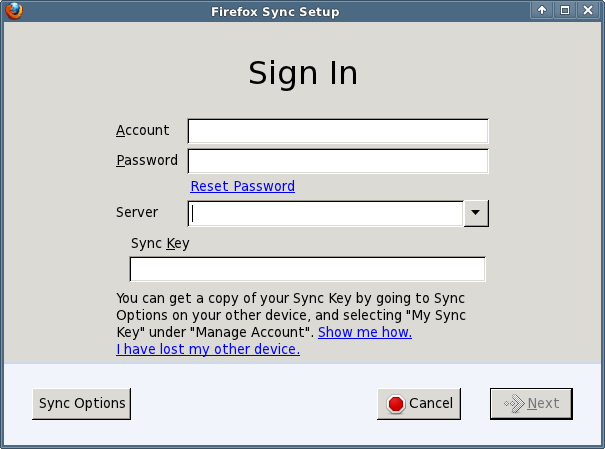

The sync key which is associated with your sync account can be retrieved at any moment should you have forgotten to write it down. Just go to a computer which has been setup for Sync, and open your Firefox browser’s Preferences at the “Sync” tab. Under “Manage your account” you will find a menu item to display your key (as well as a way to change your account’s password).
More help can be found at http://support.mozilla.com/kb/what-firefox-sync .
Securing your Sync Server with SSL
 - This section is coming soon! You really want your Sync server to be accessible over https:// if you sync over the Internet.
Sources
- Originally written by Eric Hameleers
- Original source: Alien Pastures Blog