Содержание
Установка
Установщик Slackware выглядит несколько проще, чем у большинства других дистрибутивов Linux, и сильно напоминает установщик какой-либо операционной системы BSD. Если знакомы с ними, будете чувствовать себя как дома. Если никогда не устанавливали Slackware или использовали системы Linux только с графическим установщиком, поначалу можете прийти в замешательство. Отставить панику! Разобравшись с установкой поймёте, что она очень проста, а кроме того, работает почти на любой x86 или x86_64 платформе.
Хотя новейшая версия Slackware Linux распространяется на DVD или CD дисках, Slackware может быть установлена несколькими различными способами. В этой книге мы опишем наиболее распространенный способ – установку с DVD. Если у вас нет привода CD/DVD, вероятно пожелаете взглянуть на файлы README в каталоге usb-and-pxe-installers на удобном зеркале Slackware. Этот каталог содержит необходимые файлы и инструкции для загрузки установщика Slackware с флешки или при помощи сетевой карты, поддерживающей PXE. Указанные файлы являются хорошим источником сведений о подобных методах загрузки.
Загрузка установщика
Для загрузки установщика просто вставьте установочный диск Slackware в привод CD или DVD и перезагрузитесь. Может потребоваться войти в BIOS компьютера и изменить порядок загрузочных устройств, поместив оптический привод перед жёсткими дисками. Некоторые компьютеры позволяют менять загрузочное устройство на лету по нажатию на специальную функциональную клавишу в начале загрузки машины. Поскольку все компьютеры различаются, мы не можем предложить точную инструкцию, но описанный способ достаточно прост практически для всех машины.
После загрузки компьютера с CD перед вами будет экран, позволяющий указывать любые параметры для ядра. Так сделано, чтобы установочный диск можно было использовать в качестве спасательного диска. Для загрузки некоторых систем может потребоваться указание специальных параметров, но это очень редкое исключение из общего правила. Большинству пользователей достаточно просто нажать клавишу Enter.
Welcome to Slackware version 14.0 (Linux kernel 3.2.27)!

If you need to pass extra parameters to the kernel, enter them at the prompt
below after the name of the kernel to boot (huge.s etc).

In a pinch, you can boot your system from here with a command like:

boot: huge.s root=/dev/sda1 rdinit= ro

In the example above, /dev/sda1 is the / Linux partition.

To test your memory with memtest86+, enter memtest on the boot line below.

This prompt is just for entering extra parameters.  If you don't need to enter
any parameters, hit ENTER to boot the default kernel "huge.s" or press [F2]
for a listing of more kernel choices.
После нажатия на клавишу Enter вы увидите пролетающий по экрану текст. Не паникуйте, это абсолютно нормально. Текст который вы видите генерируется ядром во время загрузки и инспектировании устройств вашего компьютера, а так же подготовки операционной системы (в данном случае это установщик). Позже вы сможете прочитать все эти сообщения командой dmesg(1) если вам будет интересно. Обычно эти сообщения очень важны для устранения проблем с железом. Как только ядро проинспектирует все устройства, прекратиться выдача новых сообщений, и вам предоставят возможность выбрать отличную от английского языка раскладку клавиатуры.
<OPTION TO LOAD SUPPORT FOR NON-US KEYBOARD>

If you are not using a US keyboard, you may need to load a different
keyboard map.  To select a different keyboard map, please enter 1
now.  To continue using the US map, just hit enter.

Enter 1 to select a keyboard map: _
Введите 1 и нажмите ввод ENTER, это выведет на экран список всех возможных раскладок для клавиатуры. Просто выберите раскладку вашей клавиатуры, и продолжайте установку.
Welcome to the Slackware Linux installation disk! (version 14.0)

######  IMPORTANT!  READ THE INFORMATION BELOW CAREFULLY.  ######

- You will need one or more partitions of type 'Linux' prepared.  It is also
  recommended that you create a swap partition (type 'Linux swap') prior
  to installation.  For more information, run 'setup' and read the help file.

- If you're having problems that you think might be related to low memory, you
  can try activating a swap partition before you run setup.  After making a
  swap partition (type 82) with cfdisk or fdisk, activate it like this:
    mkswap /dev/<partition> ; swapon /dev/<partition>

- Once you have prepared the disk partitions for Linux, type 'setup' to begin
  the installation process.

- If you do not have a color monitor, type:  TERM=vt100
  before you start 'setup'.

You may now login as 'root'.

slackware login: root
В отличии от других дистрибутивов Linux, которые сразу загрузят для вас
отдельную программу установки, Slackware установщик переводит вас в ограниченный дистрибутив, загруженный
в оперативную память компьютера.
Этот ограниченный дистрибутив может быть использован для запуска установочных программ вручную,
или для исправления проблем с загрузкой.
Теперь вы можете зайти в систему как пользователь root (без пароля в режиме инсталятора), время настроить диски.
В этом промежутке, вы можете настроить программный RAID или поддержку LVM или даже шифрование корневого раздела, но
эта тема выходит за рамки этой книги. Я советую вам ознакомиться с файлами README_RAID.TXT, README_LVM.TXT, и
README_CRYPT.TXT на установочном CD, если вы хотите установить вашу систему с использованием этих продвинутых инструментов.
Большинству пользователей, нет необходимости в этих инструментах, по этому можно просто перейти к разметке диска.
Разметка диска
В отличии от большинства других дистрибутивов Linux, Slackware не использует в установщике, специальных графических инструментов для разметки диска. Скорее, использует традиционные инструменты Linux, для разметки, они же становятся доступны сразу после установки системы. Традиционно, разметка диска производиться с помощью: fdisk(8) или cfdisk(8), обе утилиты консольные. cfdisk предпочтительнее для большинства людей, потому что основан на curses, но работает так же. Дополнительно в Slackware включён sfdisk(8) и gdisk(8). Это более мощные консольные утилиты, для разметки. gdisk необходим для разметки таблицы разделов GUID, для использования на сегодняшних больших дисках. В этой книге, мы с фокусируемся на использовании fdisk, но другие инструменты очень схожи. Вы можете найти дополнительные инструкции по использованию этих утилит, в сети или в страницах помощи man.
Для разметки жёсткого диска, вам необходимо сначала разобраться, как его идентифицировать в системе.
В Linux, всё железо идентифицируется по специальным файлам, называемые файлами устройств.
Эти файлы (обычно) расположены в директории /dev.
Сегодня все жёсткие диски идентифицируются ядром как диски SCSI, и соответственно c
ними сопоставляется файл устройств, например /dev/sda.
(Когда-то каждый тип жёстких дисков имел свой уникальный идентификатор, к примеру /dev/hda для первого IDE диска. Спустя годы, подсистема ядра SCSI перешла к общей системе доступа для всех типов жёстких дисков и оптических приводов, не имеет значения как они подключены к вашему компьютеру. Если вы думаете что это сильно запутанно, представьте что было бы, если бы у вас был SCSI жёсткий диск, Sata CD-ROM и USB флешь накопитель, каждый со своим уникальным идентификатором подсистемы. Нынешняя система не только «чище», но и так же выше производительность.)
Если вы не знаете с каким файлом-устройством ассоциированн жёсткий диск, fdisk вам в помощь.
root@slackware:/# fdisk -l

Disk /dev/sda: 72.7 GB, 72725037056 bytes
255 heads, 63 sectors/track, 8841 cylinders
Units = cylinders of 16065 * 512 = 8225280 bytes
Здесь, в моей системе вы можете наблюдать жёсткий диск находящийся в /dev/sda
размером 72.7GB.
You can also see some additional information about this hard drive. The -l argument to fdisk tells it to display the hard drives and all the partitions it finds on those drives, but it won't make any changes to the disks. In order to actually partition our drives, we'll have to tell fdisk the drive on which to operate.
root@slackware:/# fdisk /dev/sda

The number of cylinders for this disk is set to 8841.
There is nothing wrong with that, but this is larger than 1024,
and could in certain setups cause problems with:
1) software that runs at boot time (e.g., old versions of LILO)
2) booting and partitioning software from other OSs
   (e.g., DOS FDISK, OS/2 FDISK)

Command (m for help):
Now we've told fdisk what disk we wish to partition, and it has dropped us into command mode after printing an annoying warning message. The 1024 cylinder limit has not been a problem for quite some time, and Slackware's boot loader will have no trouble booting disks larger than this. Typing m and pressing ENTER will print out a helpful message telling you what to do with fdisk.
Command (m for help): m
Command action
   a   toggle a bootable flag
   b   edit bsd disklabel
   c   toggle the dos compatibility flag
   d   delete a partition
   l   list known partition types
   m   print this menu
   n   add a new partition
   o   create a new empty DOS partition table
   p   print the partition table
   q   quit without saving changes
   s   create a new empty Sun disklabel
   t   change a partition's system id
   u   change display/entry units
   v   verify the partition table
   w   write table to disk and exit
   x   extra functionality (experts only)
Now that we know what commands will do what, it's time to begin partitioning
our drive. At a minimum, you will need a single /
partition, and you should also create a swap partition.
You might also want to make a separate /home
partition for storing user files (this will make it easier to upgrade
later or to install a different Linux operating system by keeping all of
your users' files on a separate partition). Therefore, let's go ahead and
make three partitions. The command to create a new partition is
n (which you noticed when you read the help).
Command: (m for help): n
Command action
   e   extended
   p   primary partition (1-4)
p
Partition number (1-4): 1
First cylinder (1-8841, default 1): 1
Last cylinder or +size or +sizeM or +sizeK (1-8841, default 8841): +8G

Command (m for help): n
Command action
   e   extended
   p   primary partition (1-4)
p
Partition number (1-4): 2
First cylinder (975-8841, default 975): 975
Last cylinder or +size or +sizeM or +sizeK (975-8841, default 8841): +1G
Here we have created two partitions. The first is 8GB in size, and the second is only 1GB. We can view our existing partitions with the p command.
 Command (m for help): p

Disk /dev/sda: 72.7 GB, 72725037056 bytes
255 heads, 63 sectors/track, 8841 cylinders
Units = cylinders of 16065 * 512 = 8225280 bytes

   Device Boot       Start      End          Blocks   Id  System
/dev/sda1                1      974         7823623+  83  Linux
/dev/sda2              975     1097          987997+  83  Linux
Both of these partitions are of type «83» which is the standard Linux
filesystem. We will need to change /dev/sda2 to
type «82» in order to make this a swap partition. We will do this with
the t argument to fdisk.
Command (m for help): t
Partition number (1-4): 2
Hex code (type L to list codes): 82

Command (me for help): p

Disk /dev/sda: 72.7 GB, 72725037056 bytes
255 heads, 63 sectors/track, 8841 cylinders
Units = cylinders of 16065 * 512 = 8225280 bytes

   Device Boot       Start      End          Blocks   Id  System
/dev/sda1                1      974         7823623+  83  Linux
/dev/sda2              975     1097          987997+  82  Linux swap
The swap partition is a special partition that is used for virtual memory by the Linux kernel. If for some reason you run out of RAM, the kernel will move the contents of some of the RAM to swap in order to prevent a crash. The size of your swap partition is up to you. A great many people have participated in a great many flamewars on the size of swap partitions, but a good rule of thumb is to make your swap partition about twice the size of your system's RAM. Since my machine has only 512MB of RAM, I decided to make my swap partition 1GB. You may wish to experiment with your swap partition's size and see what works best for you, but generally there is no harm in having «too much» swap. If you plan to use hibernation (suspend to disk), you will need to have at least as much swap space as you have physical memory (RAM), so keep that in mind.
At this point we can stop, write these changes to the disk, and
continue on, but I'm going to go ahead and make a third partition which
will be mounted at /home.
Command: (me for help): n
Command action
   e   extended
   p   primary partition (1-4)
p
Partition number (1-4): 3
First cylinder (1098-8841, default 1098): 1098
Last cylinder or +size or +sizeM or +sizeK (1098-8841, default 8841): 8841
Now it's time to finish up and write these changes to disk.
Command: (me for help): w
The partition table has been altered!

Calling ioctl() to re-read partition table.
Syncing disks.
root@slackware:/#
At this point, we are done partitioning our disks and are ready to begin the setup program. However, if you have created any extended partitions, you may wish to reboot once to ensure that they are properly read by the kernel.
The setup Program
Now that you've created your partitions it's time to run the setup program to install Slackware. setup will handle formatting partitions, installing packages, and running basic configuration scripts step-by-step. In order to do so, just type setup at your shell prompt.
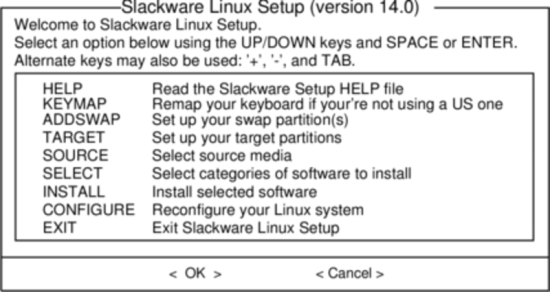
Help
If you've never installed Slackware before, you can get a very basic over-view of the Slackware installer by reading the Help menu. Most of the information here is on navigating through the installer which should be fairly intuitive, but if you've never used a curses-based program before you may find this useful.
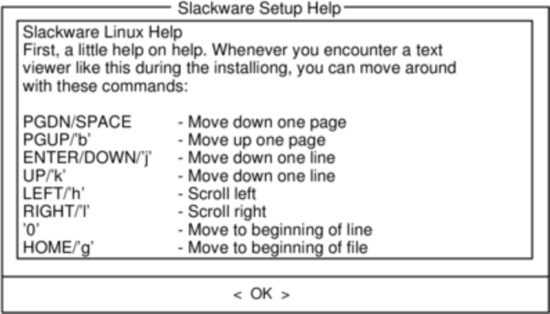
Keymap
Before we go any further, Slackware gives you the opportunity to select a different mapping for your keyboard. If you're using a standard US keyboard you can safely skip this step, but if you're using an international keyboard you will want to select the correct mapping now. This ensures that the keys you press on your keyboard will do exactly what you expect them to do.
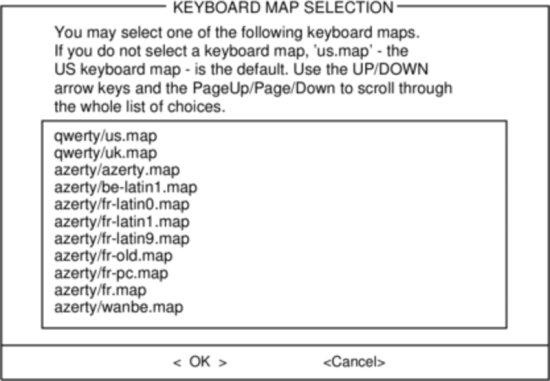
Addswap
If you created a swap partition, this step will allow you to enable
it before running any memory-intensive activities like installing
packages. swap space is essentially virtual memory. It's a hard drive
partition (or a file, though Slackware's installer does not support
swap files) where regions of active system memory get copied when
your computer is out of useable RAM. This lets the computer «swap»
programs in and out of active RAM, allowing you to use more memory
than your computer actually has. This step will also add your swap
partition to /etc/fstab so it will be available
to your OS.
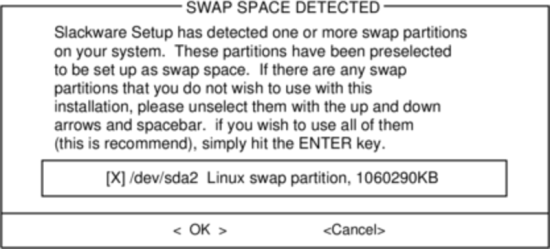
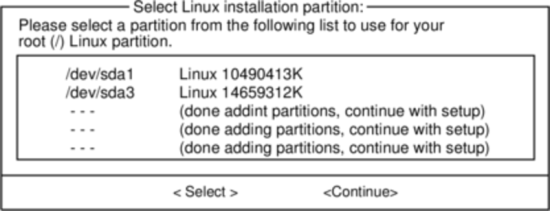
Target
Our next step is selecting our root partition and any other
partitions we'd like Slackware to utilize. You'll be given a choice
of filesystems to use and whether or not to format the partition. If
you're installing to a new partition you must format it. If you have
a partition with data on it you'd like to save, don't. For example,
many users have a seperate /home partition used
for user data and elect not to format it on install. This lets them
install newer versions of Slackware without having to backup and
restore this data.
Source
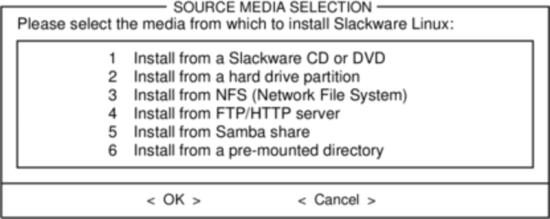
Here you'll tell the installer where to find the Slackware packages. The most common method is to use the Slackware install DVD or CDs, but various other options are available. If you have your packages installed to a partition that you setup in the previous step, you can install from that partition or a pre-mounted directory. (You may need to mount that partition with mount(8) first. See chapter 11 for more details.) Additionally, Slackware offers a variety of networked options such as NFS shares, FTP, HTTP, and Samba. If you select a network installation, Slackware will prompt you for TCP/IP information first. We're only going to discuss installation from the DVD, but other methods are similar and straightforward.
Select
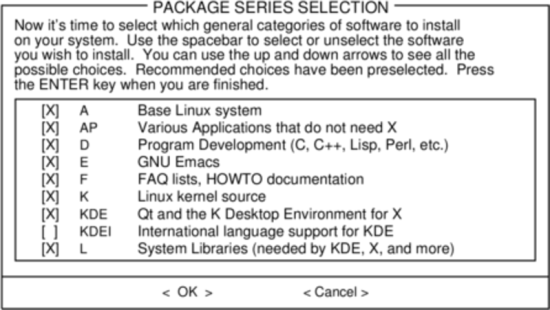
One unique feature of Slackware is its manner of dividing packages into disksets. At the beginning of time, network access to FTP servers was available only through incredibly slow 300 baud modems, so Slackware was split into disk sets that would fit onto floppy disks so users could download and install only those packages they were interested in. Today that practice continues and the installer allows you to chose which sets to install. This allows you to easily skip packages you may not want, such as X and KDE on headless servers or Emacs on everything. Please note that the «A» series is always required.
Install
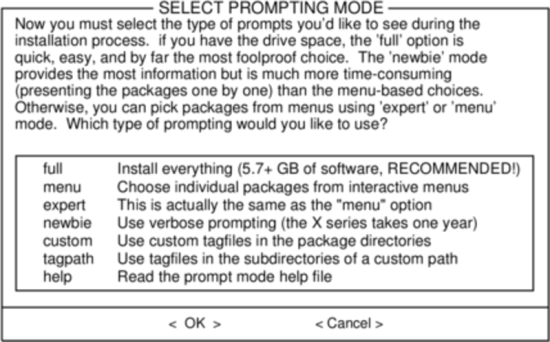
Finally we get to the meat of the installer. At this stage, Slackware will ask you what method to use to chose packages. If this is your first time installing Slackware, the «full» method is highly recommended. Even if this isn't your first time, you'll probably want to use it anyway.
The «menu» and «expert» options allow you to choose individual packages to install and are of use to skilled users familiar with the OS. These methods allow such users to quickly prune packages from the installer to build a very minimal system. If you don't know what you're doing (sometimes even if you do) you're likely to leave out crucial pieces of software and end up with a broken system.
The «newbie» method can be very helpful to a new user, but takes a very long time to install. This method will install all the required packages, then prompt you individually for every other package. The big advantage here is that is pauses and gives you a brief overview of the package contents. For a new user, this introduction into what is included with Slackware can be informative. For most other users it is a long and tedious process.
The «custom» and «tagpath» options should only be used by people with the greatest skill and expertise with Slackware. These methods allow the user to install packages from custom tagfiles. Tagfiles are only rarely used. We won't discuss them in this book.
Configure
Once all the packages are installed you're nearly finished. At this stage, Slackware will prompt you with a variety of configuration tasks for your new operating system. Many of these are optional, but most users will need to set something up here. Depending on the packages you've installed, you may be offered different configuration options than the ones shown here, but we've included all the really important ones.
The first thing you'll likely be prompted to do is setup a boot disk. In the past this was typically a 1.44MB floppy disk, but today's Linux kernel is far too large to fit on a single floppy, so Slackware offers to create a bootable USB flash memory stick. Of course, your computer must support booting from USB in order to use a USB boot stick (most modern computers do). If you do not intend to use LILO or another traditional boot loader, you should consider making a USB boot stick. Please note that doing so will erase the contents of whatever memory stick you're using, so be careful.
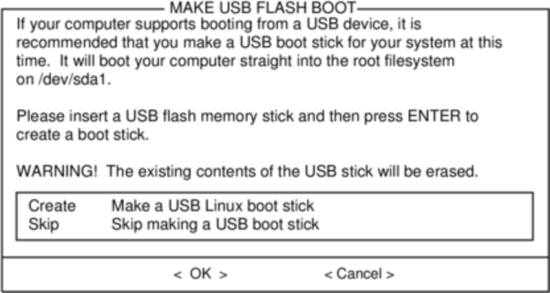
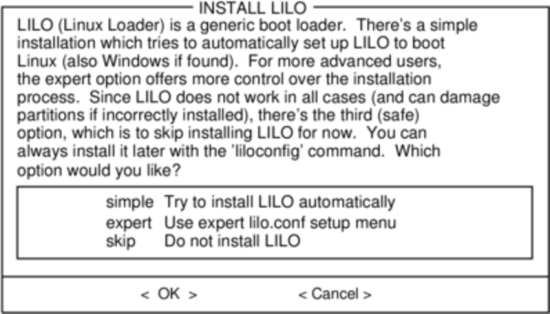
Nearly everyone will need to setup the LInux LOader, LILO. LILO is in charge of booting the Linux kernel and connecting to an initrd or the root filesystem. Without it (or some other boot loader), your new Slackware operating system will not boot. Slackware offers a few options here. The «simple» method attempts to automatically configure LILO for your computer, and works well with very simple systems. If Slackware is the only operating system on your computer, it should configure and install LILO for you without any hassels. If you don't trust the simpler method to work, or if you want to take an in-depth look at how to configure LILO, the «expert» method is really not all that complicated. This method will take you through each step and offer to setup dual-boot for Windows and other Linux operating systems. It also allows you to append kernel command parameters (most users will not need to specify any though).
LILO is a very important part of your Slackware system, so an entire section of the next chapter is devoted to it. If you're having difficulty configuring LILO at this stage, you may want to skip ahead and read Chapter 3 first, then return here.
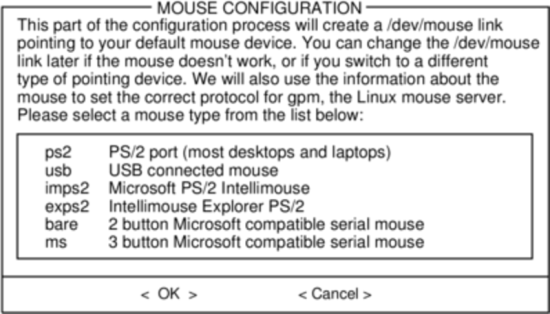
This simple step allows you to configure and activate a console mouse for use outside of the graphical desktops. By activating a console mouse, you'll be able to easily copy and paste from within the Slackware terminal. Most users will need to choose one of the first three options, but many are offered, and yes those ancient two-button serial mice do work.
The next stage in configuring your install is the network configuration. If you don't wish to configure your network at this stage, you may decline, but otherwise you'll be prompted to provide a hostname for your computer. If you're unsure what to do here, you might want to read through Networking|Chapter 14, Networking first.
The following screens will prompt you first for a hostname, then
for a domainname, such as
example.org. The combination of the hostname and the domainname
can be used to navigate between computers in your network if you
use an internal DNS service or maintain your
/etc/hosts file. If you skip setting
up your network, Slackware will name your computer «darkstar» after
a song by the Grateful Dead.
You have three options when setting your IP address; you may assign it a static IP, use DHCP, or configure a loopback connection. The simplest option, and probably the most common for laptops or computers on a basic network, is to let a DHCP server assign IP addresses dynamically. Unless you are installing Slackware for use as a network server, you probably do not need to setup a static IP address. If you're not sure which of these options to choose, pick DHCP.
Rarely DHCP servers requires you specify a DHCP hostname before you're permitted to connect. You can enter this on the Set DHCP Hostname screen. This is almost always be the same hostname you entered earlier.
If you choose to set a static IP address, Slackware will ask you to enter it along with the netmask, gateway IP address, and what nameserver to use.
The final screen during static IP address configuration is a confirmation screen, where you're permitted to accept your choices, edit them, or even restart the IP address configuration in case you decide to use DHCP instead.
Once your network configuration is completed Slackware will prompt you to configure the startup services that you wish to run automatically upon boot. Helpful descriptions of each service appear both to the right of the service name as well as at the bottom of the screen. If you're not sure what to turn on, you can safely leave the defaults in place. What services are started at boot time can be easily modified later with pkgtool.
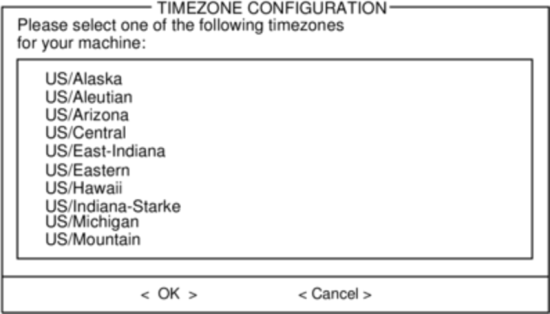
Every computer needs to keep track of the current time, and with so many timezones around the world you have to tell Slackware which one to use. If your computer's hardware clock is set to UTC (Coordinated Universal Time), you'll need to select that; most hardware clocks are not set to UTC from the factory (though you could set it that way on your own; Slackware doesn't care). Then simply select your timezone from the list provided and off you go.
If you installed the X disk set, you'll be prompted to select a default window manager or desktop environment. What you select here will apply to every user on your computer, unless that user decides to run xwmconfig(1) and choose a different one. Don't be alarmed if the options you see below do not match the ones Slackware offers you. xwmconfig only offers choices that you installed. So for example, if you elected to skip the «KDE» disk set, KDE will not be offered.
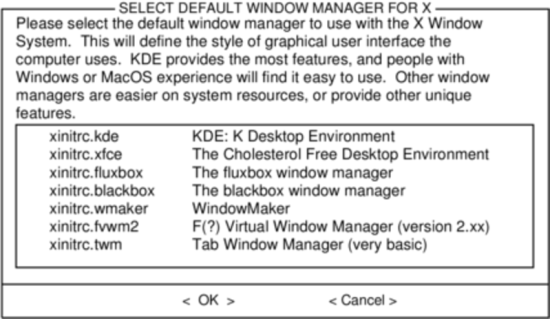
The last configuration step is setting a root password. The root user is the «super user» on Slackware and all other UNIX-like operating systems. Think of root as the Administrator user. root knows all, sees all, and can do all, so setting a strong root password is just common sense.
With this last step complete, you can now exit the Slackware installer and reboot with a good old CTRL + ALT + DELETE. Remove the Slackware installation disk, and if you performed all the steps correctly, your computer will boot into your new Slackware linux system. If something went wrong, you probably skipped the LILO configuration step or made an error there somehow. Thankfully, the next chapter should help you sort that out.
When you have rebooted into your new Slackware installation, the very first step you should take is to create a user. By default, the only user that exists after the install is the root user, and it's dangerous to use your computer as root, given that there are no restrictions as to what that user can do.
The quickest and easiest way to create a normal user for yourself is to log in as root with the root password that you created at the end of the intallation process, and then issue the adduser command. This will interactively assist you in creating a user; see User and Group Management|the section called “Managing Users and Groups" for more information.
Chapter Navigation
Previous Chapter: Introduction
Next Chapter: Booting
Sources
- Original source: http://www.slackbook.org/beta
- Originally written by Alan Hicks, Chris Lumens, David Cantrell, Logan Johnson
- Once you have prepared the disk partitions for Linux, type 'setup' to begin
the installation process.
- If you do not have a color monitor, type: TERM=vt100
before you start 'setup'.
You may now login as 'root'.
slackware login: root
