This is an old revision of the document!
Table of Contents
KVM and libvirt
With the combination of KVM and libvirt, you have an easy way of creating and managing virtual machines.
According to the official homepage, libvirt is: A toolkit to interact with the virtualization capabilities of recent versions of Linux (and other OSes). It provides management of virtual machines, virtual networks and storage; both local and remote. Since libvirt acts as an intermediate between a hypervisor and client applications, you must have a supported hypervisor installed. Examples are: KVM/QEMU, Virtualbox, Xen and VMware ESX.
Quote: KVM (for Kernel-based Virtual Machine) is a full virtualization solution for Linux on x86 hardware containing virtualization extensions (Intel VT or AMD-V). It consists of a loadable kernel module, kvm.ko, that provides the core virtualization infrastructure and a processor specific module, kvm-intel.ko or kvm-amd.ko.
Installation
Libvirt can be installed using a slackbuild script from slackbuilds.org. It provides a daemon that interacts between applications and virtual machines. It also provides a command-line shell, virsh, that can be used to manage virtual machines and to configure the libvirt environment. Virsh can also be used in shell scripts to start and stop virtual machines.
The slackware kernel has the KVM module enabled. The libvirt startup script will check the CPU and modprobe the correct driver. User-space tools are supplied in the form of a modified QEMU, qemu-kvm. This QEMU version is available from slackbuilds.org and has KVM support built-in. Only the x86 platform is supported. Since the main binary is called qemu-kvm, it can be installed next to the original QEMU.
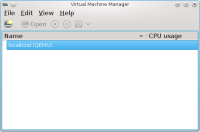
A graphical desktop management tool, virt-manager, is also available on slackbuilds.org. This provides an overview of all virtual machines and has a nice wizard to create new virtual machines in an easy way.
Configuration
libvirtd daemon
First, configure the libvirt daemon. This is done by editing the /etc/libvirt/libvirtd.conf file. Fix the default CA certificate path by editing the ca-file option:
ca_file = "/etc/ssl/certs/cacert.org.pem"
If you want to manage virtual machines as a regular user, uncomment the following options:
unix_sock_group = "libvirt"
unix_sock_ro_perms = "0777"
unix_sock_rw_perms = "0770"
This will assume a group libvirt. Create this new group and add your user to it, or use a different group.
PolicyKit setup
Libvirt is built by default with PolicyKit support. If you want to disable this, edit /etc/libvirt/libvirtd.conf. Uncomment the following options and change them to none :
auth_unix_ro = "none"
auth_unix_rw = "none"
To use PolicyKit, a new file containing policy rules needs to be created in the /etc/polkit-1/localauthority/50-local.d directory. The file needs to start with a 2-digit number and have a pkla extension. For example: 50-libvirt-authorization.pkla. The following authorization can be issued:
- Full management access: rule = org.libvirt.unix.manage.
- Read-only, or monitoring access: rule = org.libvirt.unix.monitor.
Example to give management access to all users of a given group:
[libvirt Management Access]
Identity=unix-group:libvirt
Action=org.libvirt.unix.manage
ResultAny=yes
ResultInactive=yes
ResultActive=yes
This allows all users of the libvirt group to manage virtual machines. The libvirt Management Access name is an arbitrary text you can change to fit your needs.
To allow access on a per-user basis, use the Identity=unix-user option :
[libvirt Management Access]
Identity=unix-user:frank
Action=org.libvirt.unix.manage
ResultAny=yes
ResultInactive=yes
ResultActive=yes
This will grant user frank management access to libvirt.
Automatic startup
If you want to have the libvirt daemon started automatically, add the following section to /etc/rc.d/rc.local:
# start libvirt
if [ -x /etc/rc.d/rc.libvirt ]; then
    /etc/rc.d/rc.libvirt start
fi
Make sure /etc/rc.d/rc.libvirt is executable.
Managing storage pools
Storage in libvirt is handled in terms of storage pools and storage volumes. A pool is a generic container for various storage objects. It can be a local directory, physical partition, or a network share. A storage volume is the virtual representation of a disk for a guest system. On the guest, this volume is seen as a local disk. An iso image of an installation cd or dvd is also considered a volume.
When libvirt is installed, a default storage pool (called default) is created with local directory /var/lib/libvirt/images. Any newly created volumes are created in this directory.
Create a new directory-based storage pool using virsh
Virsh commands can be passed as parameters to virsh on the command line, or you can start an interactive virsh shell by calling virsh without parameters :
# virsh
Welcome to virsh, the virtualization interactive terminal.

Type:  'help' for help with commands
       'quit' to quit

virsh #
To create a new directory-based storage pool, first make sure the target directory exists. Then use the pool-define-as command. The basic syntax for this command is : pool-define-as <pool-name> dir - - - - <directory-name>. For example, to create pool disks for directory /srv/virtualmachines/disks, use the following command:
# virsh pool-define-as disks dir - - - - /srv/virtualmachines/disks
Pool disks defined
For more complex examples of this command, check the man-page for virsh.
Check that the pool exists with the pool-list command. The -all option shows both active and inactive pools :
# virsh pool-list --all
Name                 State      Autostart
-----------------------------------------
default              active     yes
disks                inactive   no
Now, build the actual pool with the pool-build command :
# virsh pool-build disks
Pool disks built
When the pool is built, it can be started with the pool-start command :
# virsh pool-start disks
Pool disks started
Now the new pool can be used. At this point, the pool must always be started manually. In order for libvirt to start the pool when the daemon is started, you must check the autostart flag with the pool-autostart command:
# virsh pool-autostart disks
Pool disks marked as autostarted
Display information about the pool with the pool-info command :
# virsh pool-info disks
Name:           disks
UUID:           4ae08c3d-4622-9f2a-cfa9-9dea4d1eb465
State:          running
Persistent:     yes
Autostart:      yes
Capacity:       697.92 GiB
Allocation:     250.89 GiB
Available:      447.04 GiB
Create a new directory-based storage pool using virt-manager
First, make sure the target directory exists. Then start virt-manager.
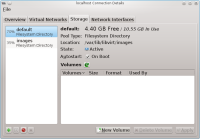
Select the host machine (default is localhost). Select Edit, Connection Details from the menu, or right-click the machine and select Details, or double-click the machine. The Connection Details window appears. Select the Storage tab.
Press the + button on the bottom left. The Add Storage Pool window appears.
Enter the name of the new pool. The default type is dir, which is the correct type. Press Forward and enter the system directory in the Target Path entry field. Press Finish to create the pool.
Creating a new virtual machine
Remote access
Troubleshooting
Remove password prompt in virt-manager
When you start virt-manager as a regular user, you may still be asked for the root password, even when you have setup the correct unix socket permissions (notification: “system policy prevents management of local virtualized systems”). This is the result of libvirt using PolicyKit. Either disable the use of PolicyKit or create a correct PolicyKit file. See PolicyKit section above.
Resources
- Red Hat Virtualization Administration Guide.


